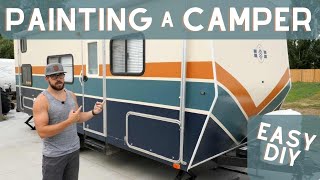
Painting Blue Winnebago RV
Painting Blue Winnebago RV
As we begin this video, we tell you that we will be painting the blue Winnebago Micro Minnie. The horribly faded blue color was the only thing we didn't like about the RV. What sold us on the idea of painting was that it was so faded that we felt certain, we couldn't make it look any worse.
When we priced wrapping or painting the trailer, we were quoted prices of $3000 to $5000. The paint, heat gun, brushes, rollers, and all other painting related things we bought came in at just under $500. We divided this project into 5 phases.
Phase 1 was removing all of the decals. We used a heat gun and lots of Goo Gone. The adhesive used on the decals wasn't all the same. While some came off relatively easy, others took lots of time and scraping. We started removing the decals on Thursday, March 28 as soon as Amazon delivered the heat gun. It took the rest of that day, and all day on Friday. Near the end of removing the decals, Sharon learned something she wished she'd known before she started. Using the low setting on the heat gun, makes it easier to remove the entire decal without leaving a lot of adhesive.
The decals were all off, but then came probably the hardest part of the paint project, and that was getting all of the adhesive off. Armed with Goo Gone we worked on removing the adhesive March 29 through Easter Sunday, March 31. It was tedious, messy work.
On Monday, April 1, Sharon taped around the door, and anything else that was a dingy black, and she spray painted them so that they look fresh. She spent all afternoon on that, and she did a great job. I'm so glad she thought of it before we did started priming or painting. The end of phase 1 happened on Tuesday when we power washed the RV.
Phase 2 was sanding which we did after the power wash. You really just want to scuff the paint; you aren't sanding as I normally think of sanding. You want it so that the primer will stick better. We used 120 grit sandpaper. This job went a bit quicker than we had expected. The part that took awhile was wiping the dust off after sanding. On Tuesday evening we wiped down the entire trailer with microfiber cloths. We do know that there are products made that will remove all that dust, but we didn't feel comfortable with those.
On Wednesday, April 3, we had some dry cloths that are made for Swiffer sweepers. We barely moistened those and wiped the trailer again and again until no blue was on the cloths. Again, we felt it really important to have a surface that to which the primer would adhere.
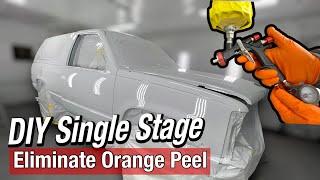
Phase 3 was taping and priming. We wiped, taped, and primed on April 3. If you've ever painted anything, you know that taping is the hardest part. Sharon wiped the top two feet of the trailer, and then she started taping. I wiped the rest of the RV while she taped. Because our RV was blue, we put on two coats of primer.
Phase 4 painting began on Thursday, April 4. We were going to see some color. From the beginning of this paint project we had neighbors we didn't know drive by several times a day to see how our work was progressing. Once we got some color on, we met those neighbors who stopped to encourage us.
The pastels are an oil based paint. The darker colors are not because the smallest oil based that was sold at McCoy's where we bought our paint was a gallon. We needed a pint, so we went with a nonoil based paint. On Friday, Sharon put on the second coat. On Saturday, we removed tape.
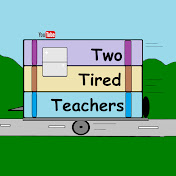
Phase 5 didn't begin until Friday, April 12 because we needed to give the oil based paint a week to cure. Phase 5 was striping. We loved our work when the trailer had all the paint on it. We loved it even more once Sharon had striped it. The striping really makes it pop.
Most of the products we used came from McCoy's Building Supply. We chose them for a couple of reasons. First, they mix oil based paints, and second, they know a lot about paint and were extremely patient with us as we asked many, many, many questions.
We used Kilz AllPurpose Primer. The box of our trail is 18' long and 7' wide. One gallon of primer was enough to put two coats on the sides and the front. The back still looks good. We used a PPG Glyptex oil based Interior/Exterior paint. For the darker colors we used a Glidden Exterior Paint. We are going to spray the darker colors with a clear gloss finish to help protect it and make it more closely match the oil based colors.
Again, we are very pleased with the finished project. Is it a professional paint job? No. Are we proud of our effort. Definitely!