One-hour skirts that fit any size. 3 simple styles and great results at once

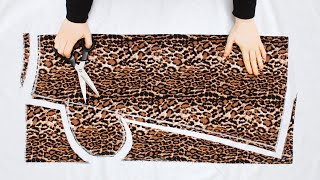
1) I sewed a light skirt “in an hour” that fits any size. Simple style, great results.
My skirt is rectangular. I decorated the style with side pockets, it is very convenient, there is a place to put a scarf or other necessary things, and they add sophistication to the product.
How to sew pockets:
On the front panel of the skirt, mark the entrance to the pocket, mine is 15 cm.
Cut burlap from the lining fabric and mark a pocket on it. The size is determined by the hand in order to be able to put the phone there.
Sew along the mark and notch the corners.
Unfold the burlap and sew a finishing stitch from notch to notch.
Take the second part of the burlap and place it under the first part, aligning the edges. Sew these parts together.
Turn the pocket inside out and make another line.
Unfold the resulting burlap pocket. This is what happens, the pocket is on the front of the skirt.
Now place the back fabric of the skirt on the front and stitch, feeling the pocket at the bottom through the fabric with your fingers.
Make a second pocket and overcast the seams.
I overcast the top seam of the skirt and made folds.
I tried the elastic band on myself and stitched it into a circle. Divided it into 4 equal parts. I also divided the skirt into 4 parts, aligned the marks and sewed it with a zigzag stitch, pulling the elastic.
All that remains is to hem the skirt. I had a white border, I left it.
This skirt will highlight your femininity and attractiveness, that’s for sure!
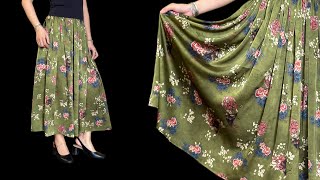
2) An incredibly feminine skirt model that can be sewn in an hour.
For my new skirt I chose a blue staple with a cute cherry pattern. Width, 1.50 m. I needed 1.50 m.
I cut it straight onto the fabric. To cut, you need to measure the circumference of the waist and hips. Along the hip line I added 4 cm for a loose fit.
I marked 3 cm along the waist line on the sides at the top and made a smooth transition to the hip line. Then there is a small flare to the bottom.
The most important thing is to make a deep smell so that the wind does not accidentally expose your legs. Each wrap detail does not reach the side seams by 10 cm.
I made darts on the front and back, 12 cm long.
I made a line at the waistline; if the skirt is too wide, you can pull it down a little.
For the flounce, I cut strips 16 cm wide, turned the edge and stitched it, gathered it into gathers. I usually make them in a ratio of 1:1.5.
For the belt, I cut out a strip of fabric, 10 cm wide. The belt is sewn to the skirt and continues on both sides. On one side 50 cm, on the other 95 cm.
For a long belt, in the right side seam, just under the belt, I ripped up the stitching and reinforced it to create a slot for the belt to enter.
Start putting on the skirt from the back first, then, then thread the long belt through the slit on the side, hugging the figure from behind. Connect it with a short belt and tie it with a bow.
I would be glad if my master class makes you want to sew a similar thing for yourself.
3) I saw an elegant thing for autumn in the store and really wanted one. I didn’t buy it, I made it even better myself.
I cut my new skirt from a basic pattern, flared it out a little, and made a yoke and pleats in the front. Suit fabric, thick.
Front half:
First of all, I basted the folds. In the middle there is a fold facing inwards and two folds are directed towards the side.
Made pockets.
I basted the yoke, its height is 10.5 cm, stitched and overcast the cut.
Rear half:
It consists of two parts, with a seam in the middle.
I sewed on the yokes, stitched the seam to the mark where the zipper ends. I ironed the allowances.
I sewed on a zipper.
I swept the side seams. At this stage I did my first fitting. The seams must be adjusted exactly to the figure so that it fits well at the waist and hips.
When everything is ready, you can sew.
To process the belt, I cut out the same yokes and reinforced them with double tape on top. I stitched the sides and basted them to the waistline. The result was a double yoke, it hid all the seams and made the upper part of the skirt rigid.
It remains to be hemmed. I swept the bottom cut. I turned it over and glued it onto the web.
I reinforce all my products only with doublesided web, thanks to it the product always looks very neat. It holds up well and does not come off after washing. Even if this happens, you can smooth it out again and everything will return to its original place.