How to Repair Peeling or Failing Clear Coat on a Budget

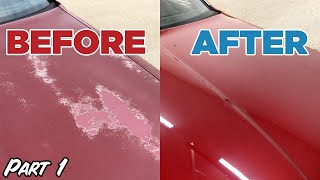
How to fix clear coat. This is more of a budget repair without any expensive tools and you can still active excellent results. The driver’s side of this truck was paint at one time and unfortunately the clear coat is failing in spots on this side. I will be repainting the fender and fender flares to clean up a majority of the issue. #autobody #painting #paintrestoration
Amazon links for various products used in the video for both USA and Canada:
USA
320 grit sandpaper: https://amzn.to/2YfzAPt
400 grit sandpaper: https://amzn.to/3qOEO0G
600 grit sandpaper: https://amzn.to/3t020uP
1000 grit sandpaper: https://amzn.to/2YkJzmq
1500 grit sandpaper: https://amzn.to/3qTem61
2000 grit sandpaper: https://amzn.to/3iWGzWX
Filler Primer: https://amzn.to/3iQSOnT
Painter’s tape: https://amzn.to/3jlUB4H
Polishing compound: https://amzn.to/3omIghF
Wax and grease remover: https://amzn.to/2M6xvCV
Isopropyl alcohol: https://amzn.to/2O82mQe
2k clear coat: https://amzn.to/3auZtBO
Canada
320 grit sandpaper: https://amzn.to/36cqjfi
400 grit sandpaper: https://amzn.to/3qVYXlK
600 grit sandpaper: https://amzn.to/2YhR9OJ
1000 grit sandpaper: https://amzn.to/36e2fZs
1500 grit sandpaper: https://amzn.to/3cfSJZx
2000 grit sandpaper: https://amzn.to/3pot4BF
Filler Primer: https://amzn.to/2NucGl5
Painter’s tape: https://amzn.to/36JqIpS
Polishing compound: https://amzn.to/36g3PKq
Wax and grease remover: https://amzn.to/39nLn4F
Isopropyl alcohol: https://amzn.to/36LY5bz
2k clear coat: https://amzn.to/37qTI63
Website: http://4diyers.com
Patreon: / 4diyers
Facebook: / 4diyers
Google Plus: https://plus.google.com/+4DIYers
Twitter: / 4diyers
Instagram: / 4diyers
Tumblr: / 4diyers
Pintrest: / 4diyers
Tools/Supplies Needed:
tools required for part disassembly
wax and grease remover
isopropyl alcohol
lint free cloth
respirator/mask
320, 400, 600 grit sandpaper
adhesion promotor
high build primer
base coat paint
clear coat
tape
masking paper
bucket of water with soap
1000, 1500, 2000 grit wet/dry sandpaper
polishing compound
new trim clips
weatherstripping adhesive
Procedure:
Remove the affect components such as the fender flares.
Using 320 grit sandpaper, sand down the surface going down to the base coat with the clear coat layer removed. A backing pad can be used to help apply even pressure across the surface without causing any waves.
The whole flare will be getting painted. It wasn’t required to go over the whole flare with 320 grit, however on those unaffected areas, this will be sanded down with 400 grit and the primer can lightly fade over these areas, ensuring those 320 areas are sufficiently covered.
Clean the flare using a wax and grease remover. Prime on the areas that were sanded with 320 grit. Considering these are a plastic panel, any areas where the plastic is exposed, shown by the black spots requiring an adhesion promoter for a strong bond.
Wait for about 5min and apply a high build primer to those peeling areas. You’ll be looking at 23 coats depending on the thickness and coverage. Wait for 510min in between coats, first starting with a light coat, and then medium to fully wet coats for the final 2.
Allow the primer to dry for 1hr. And then sand the whole fender flare down with 400 grit sandpaper. Considering this is metallic paint, finish up over the whole fender flare using 600 grit sandpaper.
Clean the area with isopropyl alcohol. This is being redone using a twostage paint, consisting of a base coat and a clear coat. Apply the paint to the surface, the 1st coat will be light and I have focused on the primed area.
Wait 510min in between coats. Apply the second coat to the whole flare. The final 2 coats will be medium to wet coats. Applying the 3rd coat to the whole flare. Now if you are touching up a larger area, you can fade the area between the old and new paint and I’ll show you this in a moment.
Wait 30min to 1hr before applying a clear coat. Waiting too soon may not allow the paint to sure enough where the chemicals get trapped and cause the clear coat to peel.
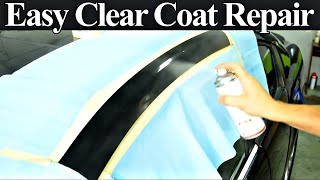
Apply a light coat of clear coat, I am using a 1k clear coat which is the cheaper version. A 2k clear coat can also be used, this is much better quality but it is, however, more expensive. Wait about 10min in between coats.
Apply a 3rd full wet coat of clear. If you are planning on wet sanding and polishing, you’ll need to wait until the paint is hard enough to work with.
Thank you to all those who watch my videos and support my content. Don't forget to subscribe to my channel for future tutorial videos and like my video if you found it helpful. New videos are always being uploaded every week!
© 4DIYers 2013
All Rights Reserved
No part of this video or any of its contents may be reproduced, copied, modified or adapted, without the prior written consent of the author.