$13 ebay Halo LED fog Light install with Angel Eye LED Switches

link to lights https://ebay.to/3cUYYQn
link to switches https://ebay.to/2WjNxMj
https://paypal.me/1997talonRestore
How to install or modify custom DIY Halo LED Fog lamps with halo LED switches or rockers in a car bumper. These went in my 1997 Saturn station wagon. These are ebay fog lights with 2 different functions. They're easy to install with just a few basic tools.
Wiring video: • 19mm LED latching switch wiring
link to lights https://ebay.to/2Tkl5Io
relay connectors https://ebay.to/2pQeMw4
switches https://ebay.to/2GVYyK0
Fuse Block: http://amzn.to/2Dqx2RN
Wire strippers: http://amzn.to/2DqgyZT
Stuff I need for production! http://a.co/iM4PGFF / velocity_labs http://velocitylabs.spreadshirt.com/ http://www.velocitylaboratories.com/ / velocitylabs / velocitylabs
script:
Halo LED Fog Lights with Halo LED switches
Fuse Block http://amzn.to/2FGHir2
Beauty shots saturn locked down different exposure
In this Episode of Velocity Labs we’re installing some sweet ass LED FOG Lights.
IN a SATURN.
Oh, and real quick in case you’re just looking for the wiring diagram, here it is. We’ll show this again later.
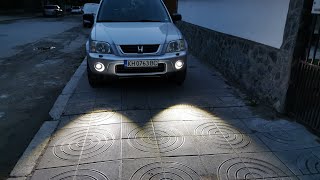
We’re going to be installing them in those factory looking spots, and I already popped one out to take a look at it. It’s just held in by a plastic groove that snaps into the bumper. So we’ll be able to drill a hole in these and mount the fog lights directly in them.
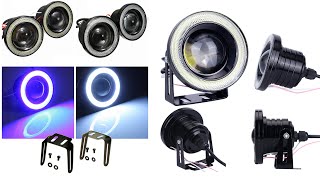
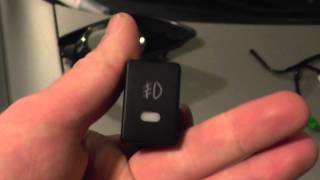
They came with some brackets but we won’t be using those because we’re going to mount them flush. Here’s all the hardware, the fog lights, 2 relays and two halo switches. We need two because the fog lights have 2 functions, the Halo Light and then the main bulb. Plus 2 switches looks dope.
I’ll also be adding this little fuse box to make things easier, but it’s not necessary. Plus this piece is easy to replace from a junkyard in case I mess it up.
It’s just a few screws and a couple clips, but some little plastic clips on it broke, so i’ll epoxy that later.
I tried taking out some plastic with some tin snips but it was making it crack pretty badly, so i switched to the die grinder and rounded out some nice openings for all the electronics to fit through. This worked WAY better than trying to cut it and it almost ended up looking like a factory design. I mean, if you squint and don’t notice the rough edges, uneven cuts and general deformity of it, it’s basically stock. I did a test fit and had a just little extra to take off over here but that will give us plenty of room to get our wires through.
With the switch fitment done now let’s fit the fog lights themselves.
I measured out and punched the center, then grabbed a hole saw. The hole size I need is about 2 and a quarter inches, but all I could find was 2 and 1/8th, which I think will be too small, buuuut it;s all I got. . I clamped them down to a 2x4 with THE CLAMPS… and then drilled out the hole in the center. As expected, it was a little too small though, so… die grinder. Now you may be wondering, how am I going to secure the fog lights to the factory plastic retainers without any bolts or screws? If you guess JB WELD plastic bond epoxy, you’d be right.
But first let’s see what they look like when they’re lit up. Hooooo LEEEE shit that looks awesome. OK, now I’m stoked, let’s get these mounted.
First we’ll scuff up the back to promote proper adhesion and then mix up the epoxy. I also remembered to use a little to fix the vent clip I broke.
Then I moved to the interior of the car to add my little fuse box and start wiring. I put it right on the drivers side kick panel, and I ran constant power to it so I can have the fog lights on when the car is turned off. However, if I ever want to change this in the future, I only need to change this one wire to the fuse box to accessory power and that will switch the whole operation to only be on when the ignition is on. So that’s a simple change if needed.
Wiring. I’m terrible at this so you’ll get no instruction from me, but here’s the wiring diagram so you can do it yourself. I also have another video explaining this more in depth if you want to check it out, the link is in the description. It’s not terribly complex but it’s time consuming and I hates it. Anyway, I wired everything up from under the car, mounted the relays on the strut tower, then wired up the switches inside the car, and oh, don’t do what I did. I got all the wires ran and connected but forgot to feed them through the nut that goes on the back of the switch and holds it in place. So I had to unplug everything and redo it.
zip tie the wires .
Now, these are $13 dollar lights from eBay. Will they last? But if they ever fail I'll let you know. Next video we're going to finish up the mods and maintenance on the Saturn Daily Driver and then we're installing a new clutch in the eclipse.