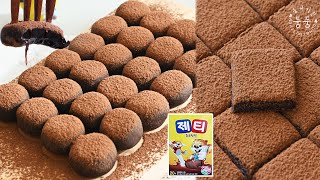
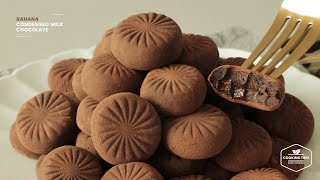
[발렌타인데이] 파베초콜릿 대신 쉽고 간단한 '연유 초콜릿' 만들기🍫 (+포장)(Condensed Milk Chocolate)

★ 연유 초콜릿 ★
오늘은 다가오는 발렌타인 데이를 위해 “연유 초콜릿”을 만들어봤습니다!
파베 초콜릿과 비슷하고, 무엇보다도 재료가 엄청 간단해서 만들기 좋아요 :)
연유 초콜릿은 생크림 없이, 연유와 코코아가루 단 두 가지 재료만 있으면 만들 수 있습니다!
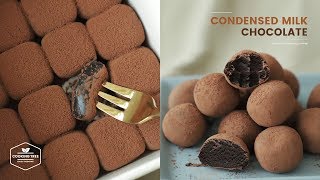
그래서 사실 맛은 별로 기대 안 했는데… 생각보다 엄청 맛있었어요…!
정말 딱 연유에 코코아 가루 넣고 만든 맛이긴 해요 ㅋㅋㅋ
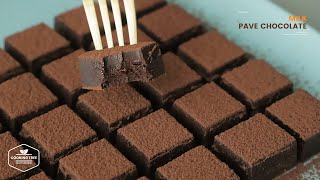
무튼, 사르르 녹는 파베 초콜릿과 다르게, 얘는 쫀득쫀득한 맛이 있어요!
파베 초콜릿과 비슷해서, 그냥 시중에 파는 파베 초콜릿용 포장 용기에 담아서 선물하면 딱 좋을 것 같더라구요.
그래서 아예 처음부터 그 포장 용기에 넣고 굳혀줬더니 포장하기에 딱 좋은 사이즈로 만들어져서 좋았어요 ㅎㅎ
만들어서 선물하실 분들은 참고하시면 좋을 것 같습니당 :)
* 코코아 가루는 제티와 같은 가당 코코아 가루가 아닌, “무가당 코코아 가루”를 사용해주세요! (조금 큰 마트의 베이킹 재료 코너에 가면 있습니다!)
** 사용한 포장용기는 “비앤씨마켓”의 “파베트레이”(11*11*2cm)와 “파베초콜릿상자” 입니다.
*** 덧가루로 코코아 가루를 많이 뿌려주셔야 작업하기 수월해요! 덧가루용으로 연유와 섞어주는 것과 거의 동량의 코코아 가루를 준비해주세요!
영상이 마음에 드셨다면, ‘구독’과 ‘좋아요’ 눌러주세요!!♥
* 재료 * (11*11*2cm 포장용기 2개 분량)
연유 200g
무가당 코코아 가루 50g
(덧가루용 코코아 가루)
* 만드는 방법 *
1. 연유를 넓은 볼에 넣고, 전자레인지에 30초간 돌려 따뜻하게 데워주세요.
2. 따뜻한 연유에 코코아가루를 체에 쳐서 넣고 잘 섞어주세요.
(저는 잘 섞이도록 두 번에 걸쳐 나누어 넣어줬습니다.)
3. 초콜릿을 넣고 굳힐 용기에 비닐랩을 씌워준 뒤 그 위에 연유 초콜릿 반죽을 붓고, 윗면이 평평해지도록 바닥에 몇 번 내리친 뒤 뚜껑을 덮고 냉장고에 넣어 1시간 이상 굳혀주세요.
(랩과 초콜릿이 생각보다 잘 안 떨어지니, 랩 위에 코코아 가루를 뿌린 뒤 그 위에 초콜릿을 붓는걸 추천합니다!)
4. 굳은 초콜릿을 비닐째 용기에서 꺼낸 뒤 코코아 가루를 뿌려놓은 도마 위에 놓고, 코코아 가루를 뿌려가며 초콜릿을 비닐랩에서 떼어내주세요.
5. 떼어낸 초콜릿을 손으로 살살 만져가며 모양을 잡은 뒤, 칼로 자르고 다시 손으로 살살 모양을 빚어주세요.
(이 때, 초콜릿이 매우 부드러워서 손에 묻을 수 있으니 덧가루용 코코아가루를 손에 묻혀가며 만져주세요!)
6. 원하는 용기에 담은 뒤, 위에 코코아 가루를 한 번 더 뿌려 마무리해주세요.
★ Condensed Milk Chocolate ★
This time, I made “Condensed Milk Chocolate” for Valentine’s Day!
It's similar to Pave chocolate, and most of all, the ingredients are very simple, so it's good to make.
Condensed milk chocolate can be made without whipped cream, with only two ingredients: condensed milk and cocoa powder!
So I didn't expect much of the taste... But it was more delicious than I thought...!♥
Unlike Pave chocolate, it has a chewy taste!
It's similar to Pave chocolate, so I thought it would be perfect to put it in a package for Pave chocolate on the market and give it as a gift.
So I put it in the container from the beginning and hardened it, and it was good because it was made in a perfect size to pack. Haha
If you want to make it and give it as a gift, please refer to it :)
* Please use “unsweetened cocoa powder”!
** Used packaging container is for Pave Chocolate (11*11*2cm)
*** It is easier to work on with much cocoa powder! Therefore, prepare about twice the amount of cocoa powder.
If you like my video, please push SUBSCRIBE & LIKE♥
* Ingredients *
Condensed Milk 200g
Cocoa Powder 50g
(+ extra cocoa powder)
* recipe *
1. Put condensed milk in a wide bowl and microwave it for 30 seconds to warm it up.
2. Sieve cocoa powder in warm condensed milk and mix well.
(I divided it into two parts so that it mixes well.)
3. Put a plastic wrap on the container and the batter on top of it, hit the floor several times to flatten the top side, and put the lid on and put it in the refrigerator for at least an hour.
(It is hard to separate the wrap and chocolate, so I recommend sprinkling cocoa powder on top of the wrap and pouring chocolate on top of it!)
4. Remove the hardened chocolate from the container and place it on a cutting board sprinkled with cocoa powder, and remove the chocolate from the plastic wrap while sprinkling cocoa powder.
5. Cut the chocolate off with a knife and gently shape it with your hands.
(At this point, chocolate is so soft that it can get on your hands, so touch it with extra cocoa powder on your hands!)
6. Put it in the container you want and finish it with another layer of cocoa powder.
이 레시피의 무단 도용 및 영상의 무단 도용, 2차 편집을 금지합니다.


![[Simple and easy] How to make condensed milk chocolate with 2 ingredients 쫀득한 연유초콜릿만들기](https://i.ytimg.com/vi/Sq51W0Vg9YE/mqdefault.jpg)