Replacing a Compressor Start to Finish

In this video, we show Kalos's process of replacing a compressor from start to finish. We replace a Copeland scroll compressor in a Carrier unit and demonstrate some best practices along the way.
Our compressor installation process has several phases, including a preparation phase. That's when we do our research about the failure that was diagnosed, learn about warranty and billing information, and acquire all of the necessary materials for the job, including acid test kits, a matching capacitor for the new compressor, filterdriers, and virgin refrigerant (in the case of a burnout). Upon arrival, we confirm the diagnosis and ensure that we have the correct replacement equipment (including the compressor and hard start kit).
In this case, our compressor failure was diagnosed based on a loud grinding noise and a leaking internal bypass valve; in a scroll, that would indicate a scroll running backward or shorting. We also notice an oil leak on the copper line set. We determine that there is a mechanical failure without significant acid. (You can usually smell acid or notice fouled oil; in that case, we recommend following the complete acid protocol with a thorough testing kit.)
Our first step of compressor removal is to recover the existing refrigerant completely, and we speed up the process by removing our Schrader cores. You can also see how the charge amount might have contributed to the failure. As we recover the charge, we can clean the drain and evaporator coil as well as check over the rest of the system, including the metering device.
With the refrigerant charge fully recovered, we unwire the compressor completely, remove the foot bolts, and cut both refrigerant lines as near to the old compressor as possible. Unsweating is NOT recommended, but be sure to purge the system with plenty of nitrogen if you have to unsweat the lines. When you cut the lines, make sure you clean the copper with a sand cloth BEFORE you cut and then protect the lines from contamination with something like masking tape or by flowing nitrogen when it's practical. Once all that has been taken care of, we can then remove the old compressor.
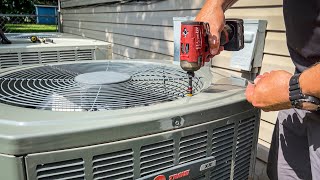
When we insert the new compressor, we also install new filterdriers as necessary. (In this case, we just use a new liquid line drier, but burnout cases may require a new suction drier.) We lower the compressor into the condensing unit and tighten down the bolts. When brazing, we use heatblocking putty to protect components and flow nitrogen (25 SCFH) to keep the lines from oxidizing or getting contaminated. Then, we install the capacitor and replace the contactor as necessary. Try to arrange your wiring in a way that will prevent wire rubouts.
After that, we bubbletest our joints and then pressurize the system with nitrogen. The pressurization settings will typically be around 250500 PSI but will vary by system type and refrigerant type, so be mindful of those. The pressure should hold steady, and the oil in your vacuum pump should be clear. If the pressures decay too much, there could be a leak or moisture in the system.
Once your system is clean, tight, and dry, you can liquidcharge the system. Make sure you don't add liquid refrigerant directly to the compressor or anyplace where it might get into the compressor. (The discharge port is USUALLY safe because it should have a check valve, but be mindful of that. We usually recommend adding the refrigerant to the liquid line.) You can also turn on the crankcase heater to reduce the probability of liquid slugging on startup.
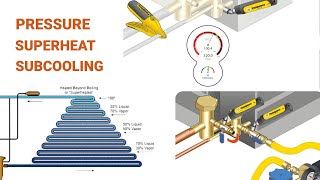
Once the charge is equalized, you can run the system with an amp clamp on the compressor to check the amp draw. If you notice odd noises or problems, turn the compressor off and diagnose the problem. Once you ensure that the system starts up appropriately, use the factory superheat settings. Take all of your necessary readings (including superheat, subcooling, discharge line temperature, and delta T), check the system in heat and cool modes, and make sure you WATCH the condensate drain out before walking away from the job.
When sending the old compressor for a warranty return, be sure to braze the ends of it shut (or follow the manufacturer's guidelines for shipping return parts) and state what the failure was in the paperwork. That is the end of ac compressor replacement process.
AMRAD: https://www.americanradionic.com/
Carrier: https://www.carrier.com/carrier/en/us/
Mitsubishi Cooling & Heating: https://www.mitsubishicomfort.com/
Refrigeration Technologies: https://www.refrigtech.com/
Read all the tech tips, take the quizzes, and find our handy calculators at https://www.hvacrschool.com/