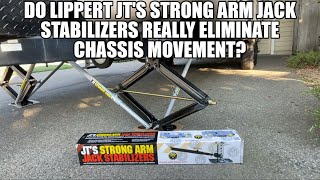
Lippert JTs Strong Arm Jack Stabilizer Kit Installation - 2022 Jayco Jay Feather Travel Trailer

Click for more info and reviews of this Lippert Camper Jacks:
https://www.etrailer.com/CamperJacks...
Check out some similar Camper Jacks options:
https://www.etrailer.com/deptpgCamp...
Search for other popular Jayco Jay Feather Travel Trailer parts and accessories:
https://www.etrailer.com/vehicle/2022...
https://www.etrailer.com
Don’t forget to subscribe!
/ etrailertv
Full transcript: https://www.etrailer.com/tvinstalll...
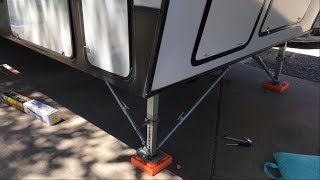
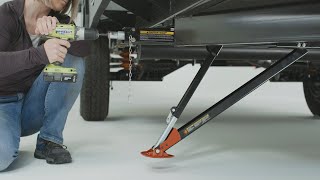
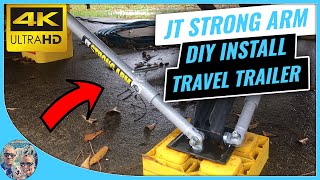
Hey everybody, how's it going Today, we're gonna be going over the JT Strong Arm Stabilizer Kit here on a 2022 Jayco Jay Feather. So these are what our Strong Arms look like installed on the trailer. So in the front here we're gonna have two arms for each jack. We're gonna have two bolts on the bottom of our jack here. So one of those goes to the inside one. One of these goes to the outside one.
And then it's gonna simply be bolted to the bottom of the frame. So we mentioned two in total for each of our front jacks and there's only gonna be one on the rear for a total of six. So if we look at the top of the arms on the outer tube each of our jacks is gonna have this little Thandle here. So basically, what this does is this is gonna hold our outer tube to the inner tube. So while we're traveling down the road we wanna make sure it's snug.
But when we weren't going to be using the jacks when we're gonna lower the jacks you wanna make sure you loosen them. So what I'm gonna do now is I'm gonna loosen this one here and I'm gonna loosen the one on the other side. We're gonna go ahead and extend the jack down so we can make contact with the ground. So if we notice while we're lowering the jack, you can see that inner arm actually extend out of the outer tube there. So once we have contact with our jack foot on the ground what we're gonna do is we're just gonna come back here and we're gonna snug up those Thandle bolts.
Now, once we've done that we're gonna do that for each of our four sides and that's pretty much gonna be set up. We're good to go. Overall, our stabilizers are gonna help improve the stability of our trailer. So our trailer has a suspension. So when we're walking around inside it's constantly gonna be flexing back and forth and side to side.
And what these stabilizers do is they really stiffen that movement up there, take a lot of the play out of there. So it's gonna be much more stable when you're inside walking around. So there are a couple different options for stabilizers on the market. We have the ones that install between the tires. There's sort of like an expiration, they expand out. Although those do work well, there's really nothing that beats these Strong Arms here because they install in each of the four sides of our trailer. Now, I personally haven't used them other than just what I've been testing now but I have talked to a couple people that have used these for an extended period of time and they really love them and they swear by them. So if your overall goal is to improve the stability of the trailer while you're parked there really isn't a better option on the market than these. So in regards to installation I'll admit when I was looking through the instructions and the hardware, like, it sort of overwhelming because there is a lot of different nuts and bolts and the instructions are rather worthy. But once I really started to dig into it and began installing it, it was really a lot more straightforward than I originally thought. We do have to drill a couple holes into the bottom of the frame of our trailer but so long as we do that correctly it's really not gonna cause any harm. And I definitely think the benefit is gonna be worth it in the end. Now, with that being said, we'll go ahead and walk you through this entire process step by step now. So the first step of our installation, we're gonna come to the front of our trailer here. We're gonna locate one of our jacks. Now we can start on either side, it doesn't matter. But we're gonna be starting over here. So we're gonna locate the jack and then we're gonna have two bolts securing the jack foot to the jack. We're gonna be starting with the one closest to the inside here. Take a 17millimeter socket and we're gonna remove this nut here. We do need to hold the bolt head on the inside. So it's gonna take a wrench there. Go ahead and just remove that bolt in our nyloc nut. Now you may be able to push your bolt out by hand. Ours is pretty tight so we're just gonna take a hammer here. We're just gonna lightly tap that bolt. So here we go. That's what our bolt looks like once we remove it. Now, we're actually gonna be replacing these with one of these hoover bolts that come in your kit. It looks like this. It's a 3/8 inch bolt and it's four inches long. So this side here is gonna go outward