Infinite Rust Removal? DIY Electrolysis Setup for only $20 in 2023

Have you been putting off making your own electrolysis setup to remove rust from all your tools because it seems scary or complicated? Are you worried that price inflation makes electrolysis too expensive? Have no fear electrolysis 101 is here and all for around only $20 in supplies!! Electrolysis costs only a few cents to operate each time and delivers equal or better results than any expensive rust removing products.
This tutorial is meant to be a basic beginner's guide to the process. There are many, many more indepth analyses and setups for electrolysis, but I've found this method to be one of the simplest and foolproof for someone doing electrolysis for the first time.
Please note this tutorial is for informational purposes only. Do not attempt anything in this video without proper professional supervision.
Supplies list:
▪ Red and black wire (~12 gauge): $5 for 2 feet of each from the local hardware store, or scrap wire if you have it for free
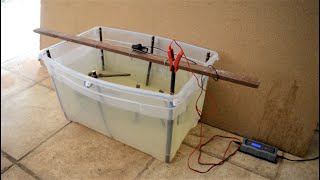
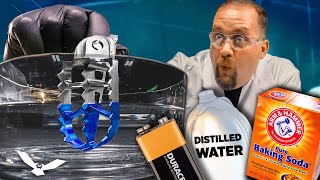
▪ Plastic container (12 quarts): $3 at the local discount dollar store
▪ Washing Soda: $4, Walmart (find it in the laundry detergent aisle)
▪ ~12” piece of plain rebar: $3, Home Depot
▪ Large alligator clips: $7, Amazon: https://a.co/d/eT9vKiR
▪ Laptop charger: free, who doesn’t have an old one laying around?!
Tools:
▪ Safety glasses (always!)
▪ Electrical tape
▪ Drill or drill press
▪ Wire strippers
▪ Optional: soldering iron and soldering wire
____________ Timestamps _____________
0:00 0:28 Supplies and Tools
0:29 0:48 Laptop Charger details
0:49 4:20 Building the power source
4:21 6:15 Electrolysis bath setup
6:16 7:04 Rusty part cleaning and care
7:05 7:16 Clean up
7:17 7:43 Tips and suggestions
_____________ Electrolysis notes and detail ______________
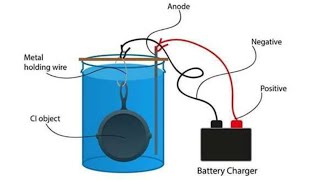
Laptop charger selection: almost any charger will do as long as it is an AC adapter that converts alternating current to direct current. All chargers are different, so carefully review the wiring diagram printed on the charger label to determine which wires are positive and negative. There is sometimes a third wire as well that is for the charging light you can just tape this one off with electrical tape.
Anode/Steel selection: You must use ferrous metal ( steel) for the electrolysis process to work. Any steel will work as long as it is not stainless steel. Stainless steel contains high amounts of chromium which may leech into the electrolysis bath during use, creating byproducts that are highly toxic and illegal to dispose of without a special permit. Just avoid stainless steel entirely for safety.
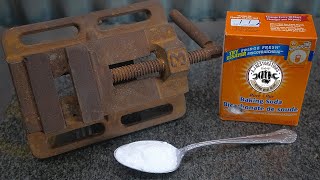
Cathode/piece to be cleaned: If the part is very rusty, you may need to brush off a small area to expose metal so the piece can conduct electricity. If you see bubbles only forming on the alligator clips and not the part, then the part is not conducting.
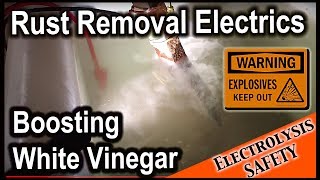
Electrolyte choice: Some people use salt or baking soda (sodium bicarbonate) instead of washing soda (sodium carbonate) as an electrolyte. Using salt release chlorine gas, which is larger amounts is dangerous to inhale, so I avoid salt. Baking soda is generally okay, but does not provide the same amount of electrical conduction that washing soda provides. The washing soda will stay in solution forever, so you can reuse the same bath over and over it doesn’t lose potency over time (although water may evaporate). No matter how dirty the electrolyte bath is, it will still work fine.
Running electrolysis: You can let the electrolysis setup run as long as you want. It will never degrade the rusty piece you are cleaning no matter how long you run it for. You may need to rotate the part every once in a while to ensure it cleans evenly the electrolysis process works by direct “line of sight” with the anode. NEVER let the red and black leads or anode and cathode touch when plugged in this will cause the circuit to short and can blow out your power supply or even trip a breaker in your house. ALWAYS unplug the charger before reaching into the solution or touching the anode or cathode. Wearing rubber gloves is also encouraged for extra safety.
Cleaning the cathode/rusty part: After electrolysis you can wire brush it by hand or with a wire wheel on a bench grinder or drill. Immediately after finishing wire wheeling, rinse the part in acetone or isopropyl alcohol to remove as much residual water from the part as possible to minimize rusting. Coat the surface with an oil or WD40 to prevent it from immediately rusting again (called “flash rusting”).
_____Other useful electrolysis resources______
https://www.qsl.net/2e0waw/rust.htm
_________ Social Media ________
Instagram: @catalyst_restorations
MERCH SHOP: https://mystorecae4fb.creatorsprin...
#restoration #electrolysis #rust
![I Restored and Enhanced this $1 Antique Wood Level with Brass! [feat. How to Brass Plate Steel]](https://i.ytimg.com/vi/iCwDMyTs4-s/mqdefault.jpg)