How to Tie a Headscarf - Dana-Farber Cancer Institute

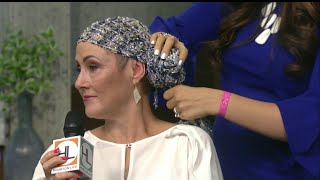
Watch WCVB TV reporter Kelley Tuthill, a breast cancer survivor treated at Dana Farber, share her tips for headscarf tying. Kelley demonstrates three different ways to tie a headscarf: the basic bandana; an oblong scarf over a turban; and a large headscarf with a twisted rosette detail.
Find more resources to help combat the physical effects of cancer treatment at DanaFarber's Friends Place: http://www.danafarber.org/AdultCare...
Transcription:
Hi. I’m Kelley Tuthill, reporter at WCVB TV Channel 5 here in Boston. I’m also a breast cancer survivor who was treated here at DanaFarber Cancer Institute. I know firsthand how difficult it can be to lose your hair and have so many changes to your appearance as a result of chemotherapy. But I’m also here to tell you that if I can go on TV despite all that, you can figure out how to go out and face the world as well and still enjoy life.
One option that I think is great is scarves. You can play around with them. But I also encourage you to try out hats and wigs and find the look that works for you and then go with it. If you feel good about the way you look, everybody around you is going to be very comfortable with it as well. So, let’s today figure out how to tie scarves. I’m no expert, and if I can figure this out—trust me—so can you.
We’re going to start with a basic 30inch cotton scarf. That’s a good size and will give you great coverage. You want to start by folding it into a triangle. Then you simply put it on your head. Then you’re going to tie it in the back kind of midway through your head here, just before it kind of scoops in in the back. And then to create a natural look as if you had hair, kind of fluff it out a little bit. There’s no right way or wrong way to do this. You’re going to play around with it and see what look works for you. You can either leave these hanging down, maybe hide the tag. Or you can tuck everything in. It’s easy enough to do. It’s really a simple look, just like a bandana that you might have worn anyway.
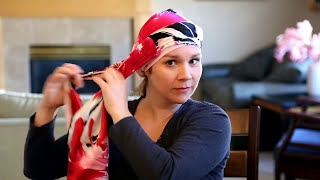
Another look is to wear a turban like this one. This is cotton. It’s very soft against a bald head. It can keep you warm at night, because it can get awfully chilly. Or you can wear it around the house or out for doing errands. If you want it to look a little fancier, we have a suggestion: take an oblong scarf and twist it. It’s like this—very easy to do. Then you can put it on top of the turban, tie it in the back like so, and that gives you a different look. It just makes it look a little fancier to go out and meet friends or do whatever. If you want to keep going with this, you can also twist it further like this, go back around to the top of your head, tie it in a knot, and then just tuck in the ends underneath the rest of the scarf. Hide that tag. And then you’ve got another great look to wear out with your friends.
I’ll admit, I was a little intimidated by the thought of attempting the rosette scarf tying, but after a little practice, I can do it—and I’m sure you can, too. You want to start with a big oblong scarf—a long one like this one. This one is rayon, which seems to be a little easier than trying with a silk scarf. You’ll want to put it over your head like this, so that the back is hanging down. And then the challenging part is that you want to get both ends with each hand and tie them. That takes a little practice, because this is a longer scarf than what you might be used to tying. If you have an extra set of hands, great! If not, like I said, with a little practice, you’ll figure it out. I’ve got the first one tied, and then I’m going to go back and tie it in a second knot. So, then you can play with the top here. The key is to have it secure—you don’t want to worry about the scarf all day long. Then take the two ends, shift the scarf over a little bit, take the two ends, and start twisting. I’m finding that it works well to twist about halfway down and then start to make the rows. So, you want to go back up toward your ear and start going around. What I find works is that you can hold the rosette with one hand while twisting with your other hand. You can see that there. Keep twisting around. I’m switching hands here to get the look that works for me. Again, see—I’m twisting this and going around. It just takes a little playing. I’ve tried it different ways to get the way that works best for me and the look that I like. I’m still twisting the end, and then what you have left at the end, you’re going to tuck in like so. Not bad, huh? With a little practice, you can do it, too.