How To Make DIY Cross Polariser Filter At Home For Dental Photography (Ring Flash and Twin Flash)

Taking a photo with a cross polariser is hugely helpful for dental photography, when assessing a tooth's shade and characterisation. It removes reflection from the image, so you can more easily assess the correct shades of the teeth, as well as individual characterisations in the tooth itself. This is helpful for shade matching composite resin when doing anterior resin work, as well as shade matching for your laboratory.
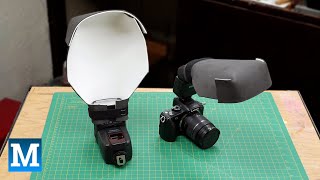
You can buy a premade cross polariser, but they are very expensive ($300+), or you can make a DIY cross polariser for dental photography, like I do in this video.
The most important thing that you need is the cross polarise sheet. You also have to make sure that it is linear.
In this video, I show you how to make a cross polariser for your ring flash, as well as for your twin flash, and a few variations of how to make them and how to mount them to your flash.
One thing to remember, is when using it, it makes the image darker so you have to change the fstop, the shutter speed, or your ISO to increase the brightness.
If you have any questions, put them in the comment section below!
Chapters:
0:00 Intro
0:31 Disclaimer
0:42 Materials that you will need
1:28 Making the twin flash polariser
6:06 Two different variations
6:24 Mounting onto twin flash method #1
7:04 Mounting onto twin flash method #2
9:06 Making the ring flash polariser
13:09 Mounting onto ring flash
13:45 Change your camera settings first!
14:04 Seeing them work in action
14:33 Outro