How to make AWESOME VIDEOS for your online course (video recording tutorial)

You've finished your course outline, written your script, now it's time to make some awesome videos for your online course. Seems simple enough, right? Just set up the tripod, camera, lights, microphone, teleprompter, make sure there's enough space on the memory cards, are the lights too bright? Is my hair okay? Why am I so blurry?
Making videos can quickly become a challenging, complicated task. In this tutorial, we'll simplify the process for you and give you the tips you need to make awesome videos that will wow your students.
#makingvideos #recordinganonlinecourse #onlinecourses
TIME STAMPS:
Intro 00:00
1. Prework 01:07
Branding 01:14
File organization 02:12
Prep for delivery 02:56
2. Setup 03:18
Camera 03:48
Lights 05:30
Microphone 06:35
TelePrompTer 07:15
3. Filming 08:36
Relax 08:55
Keep water nearby 09:09
One section at a time 09:13
Focus on your student 09:25
Create separate recordings for each lesson 09:45
You don't have to do it all at once 09:58
Ending 10:30
SUMMARY
Recording your course can be broken up into three parts: prework, setup, and filming.
1. Prework
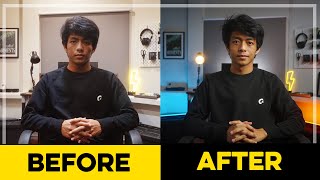
Branding: Be intentional about what you're wearing, the appearance of your studio, the style of delivery, etc. and make sure it matches your brand.
File organization: Create a file structure that makes sense to you so your files will be organized and easy to upload once you're done making your videos.
Prep for delivery: Make sure your scripts are easy to read and broken up into 13 sentence sections for the TelePrompTer.
2. Setup
Camera
*Make sure you're framed properly, typically from about midchest up with a bit of space above your head.
*Check that you are in focus.
*Look at the ambient light in the room to determine whether or not you need to add light to your shot.
Lights
*Three point lighting technique
Key light: brightest light, pointed at a 45 degree angle toward one side of the subject.
Fill light: softens shadows from key light, pointed at a 45 degree angle on the opposite side of the subject.
Rim light: set up above and behind the subject and casts a rim of light around the subject to separate them from the background.
Microphone
*Determine whether or not you want to set it up out of frame.
*Make sure it's close enough to get a clear capture of your voice and that the diaphragm (the part of the mic that captures sound) is pointed toward you.
TelePrompTer
*Use a TelePrompTer app on your smart phone or tablet. I recommend PromtSmart: https://promptsmart.com/'>https://promptsmart.com/
*You can use it with a beam splitter glass (https://www.amazon.com/GlideGearTMP...) or you can put it on a stand just above your camera lens.
3. Filming
Relax: take deep breaths between each take
Keep water nearby
Take it one section at a time: It's better to record in sections than to get all the way through a take, mess up, and feel like you have to do the whole thing over again.
Focus on your student: If you keep your student's results in mind, it's easier not to be selfconscious.
Create separate recordings for each lesson: This will make it easier to keep your files organized.
You don't have to do it all at once: If you need to put away your lights and cameras between sessions, just remember where you set everything up and your settings.
RESOURCES:
PromptSmart TelePrompTer app: https://promptsmart.com/'>https://promptsmart.com/
Beam splitter glass: https://www.amazon.com/GlideGearTMP...