How to Install Schluter KERDI-BOARD in a Bathroom Part 1 (Step-by-Step)

For more home improvement tips visit https://www.homerepairtutor.com/
Supplies we used for this project
Kerdi Board kit https://amzn.to/2GcuU5J
Kerdi Trowel https://amzn.to/2t6VaGb
6" putty knife https://amzn.to/2GpXD6w
Unmodified thinset https://amzn.to/2BnJPWR
Sundstrom Silica Dust Respirator https://amzn.to/2MkIB30
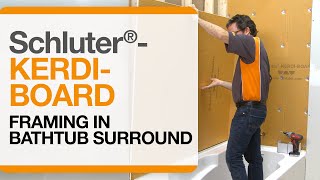
Waterproofing your bathroom's shower or tub surround can be hard.
But it doesn't have to be this way.
Schluter's KERDIBOARD is easy to install.
Today we'll show you how to install KERDIBOARDs in a bathtub surround and make your bathroom wall waterproof.
This is Part 1.
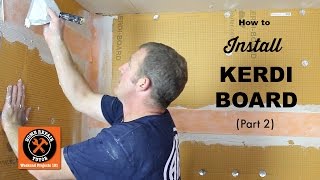
In Part 2 we share how finish the project with KERDIBAND.
Check out Part 2 here
• How to Install Schluter KERDIBOARD i...
Here's what we like about KERDIBOARDs, they're
light
can be cut with a utility knife
don't create dust
thermally insulating
and fast to install
Plus it's not messy, that's always icing on the cake.
Start the installation by measuring your main wall.
Cut the KERDIBOARD to size with a utility knife.
Btw, KERDIBOARDs come in different thicknesses and dimensions. In our example we used 48" x 64' x 1/2" boards.
You need to attach the boards to studs using Schluter's washers and screws.
There are specific requirements for screw spacing, we cover this in the video and our written tutorial over on Home Repair Tutor.
For all the details watch the video, we think you'll love the stepbystep instructions
• How to Install Schluter KERDIBOARD i...
If you liked this video and need more home repair help around your home you might want to subscribe to my YouTube channel by clicking this link and then the Subscribe button
/ homerepairtutor
Feel free to share this video with your friends either via email or on Facebook
• How to Install Schluter KERDIBOARD i...
There's nothing better than helping a friend out with a DIY video that could make their project go a lot better.
Thanks for watching my video, take care, and see you in the next one!!
Cheers,
Jeff