Ford Transit AWD Lift Install

In this video, we will be showing you how we installed a lift kit on our AWG Ford Transit Camper Van Conversion.
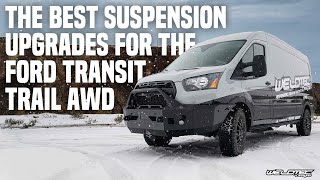
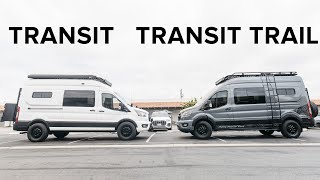
The suspension upgrade package that we went with is the Van Compass STAGE 4 TOPO 2.0 SYSTEM TRANSIT AWD which includes adjustable rear Falcon 3.3 SP2 shocks, with 2.0" of lift for improved ground clearance. The Topo Front Lift kit combines a precision engineered 0.75" lift camber correction plate, with a tuned coil spring while the rear lift is accomplished by a 5 leaf mini spring pack: https://vancompass.com/products/copy...
We also show how to install bigger tires and wheels on the camper van after we installed our lift kit. The video has been broken up into chapters for easy navigation.
Thank you again to Van Compass for sending us this kit! Now our van is ready for offroad adventures with the ground clearance we have gained from adding this lift kit to the van.
00:00 Introduction
00:10 PreInstall Measurements
00:31 Jack Up Rear of Van
01:16 Disconnect Shock
01:48 Disconnect Axle Housing from Leaf Springs
02:29 Install New Leaf Pack
04:44 Shock Mount Modification and Bracket Install
06:41 Falcon SP2 Rear Shock Explanation
09:14 Rear Shock Install
10:33 Add Spacer to Bump Stop
11:09 Rear Suspension Wrap Up
11:59 Install New Wheels and Tires
12:14 Jack up Front of Van
12:41 Disassembly Remove Tie Rod End from Steering Knuckle
13:03 Remove Brake Caliper
13:40 Disconnect Sway Bar End Link
14:07 Disconnect Sensor Wires
14:56 Remove Axle Nut
16:03 Detach Steering Knuckle from Strut and Lower Control Arm
17:48 Disconnect Steering Knuckle and Lower Control Arm
19:02 Remove Strut Assembly
21:18 Replace Coil Spring
22:37 Reassemble Strut
24:58 Cut Down Studs with Angle Grinder
25:34 Install Strut Spacer
26:40 Connect Strut to Steering Knuckle
28:27 Reinstall Strut and Steering Knuckle on Van
30:08 Reassemble Steering Knuckle to Lower Control Arm
30:44 Sway Bar End Link Relocation Bracket Install
32:27 Reconnect Sensor Wires
33:20 Reconnect Brake Caliper to Steering Knuckle
34:23 Reattach Tie Rod End to Steering Knuckle
34:52 Reinstall Axle Nut
35:16 Front Suspension Wrap Up
35:56 Attach New Tires and Wheels
38:01 PostInstall Measurements
38:38 Tips for Success
➤Shop the EXPLORIST.life store: https://shop.explorist.life
➤Shop Battle Born Batteries: http://battlebornbatteries.com/?afmc=...
✅Use code 'explorist' for $50 off per battery.
➤Binge the Transit Van Build: • The Ultimate Camper Van Build Guide ...
Here are some additional resources that you may find helpful with planning and installing your DIY Camper:
➤ FORD TRANSIT DIY Camper Van Electrical Install: • DIY CAMPER VAN ELECTRICAL INSTALL (St...
➤ DIY Sprinter Camper Van Electrical Install Full Tutorial: • DIY Sprinter Camper Van Electrical In...
➤ DIY Camper Solar Wiring Diagrams: https://www.explorist.life/solarwirin...
➤ How to Perform a Power Audit: • How Much Solar Power Do I Need for My...
➤ Basic Parts & Components of an Electrical System: • Basic Solar Parts Needed for a DIY Ca...
➤ How to Cut Wire: https://www.explorist.life/howtocut...
➤ How to Strip Wire: • How to Strip Wire from 4/0 to 24 AWG
➤ How to Crimp Wire: • How To Crimp Wire Lugs & Ring Termina...
➤ How to Make MC4 Connectors: • How To Make MC4 Connectors (For Wirin...
➤ How to Wire Solar Panels in SeriesParallel: • How to Wire Solar Panels in Series Pa...
➤ How to Crimp Wire Ferrules: • How to Crimp Ferrules (and Why You Ne...
➤ How to Wire an AC/DC Breaker/Fuse Box: https://www.explorist.life/howtowir...