🔥 Floating Shelf ▶︎ how to make resistant plasterboard shelf 👉 Drywall

How to Assemble SHELVES with PLADUR (Threshing Plate)
✅ • Cómo Montar ESTANTES con PLADUR (P... ✅
In this video I will show you how to fix the profiles for plasterboard on the wall so that our shelf is resistant. You will also see that, when putting the plasterboard plates to our structure, it is convenient to screw throughout the entire structure for greater resistance.
Book a personalized consultation with me at: http://www.tutorialcreativo.com/consulta
Guide to help you analyze the budget: http://www.tutorialcreativo.com/guia
Do you like the articles in my video? Here you have them:
✔Solar Lamp Outdoor Lighting: https://bit.ly/37GINZ2
✔ Rechargeable Led Headlamp: https://bit.ly/3N0WAd1
✔32L folding box: https://bit.ly/361eNXu
And if you are new, here are special discount codes:
Discount code: YHKOL4
€4 discount for a minimum purchase of €5
For new users
Valid until 3/31/2022
▶ fischer SX plug
Characteristics:
4way expansion ensures maximum grip.
The shock penetration lock prevents premature expansion of the plug during its introduction.
The rim prevents the plug from slipping through the hole.
Resistant to temperatures from –40° to +80°C.
Antirotation fin in outer position to prevent rotation even in the most hollow materials.
The expansionfree neck prevents damage to tiling and plaster.
Video transcript:
Very good!
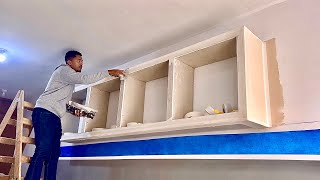
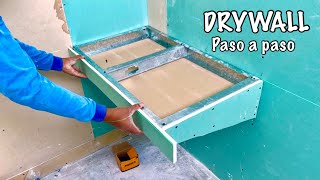
Today we are going to see how we should fix this shelf so that it supports heavy weights.
This video is sponsored by AliExpress. In it you will find these three products.
We grab our tools and get to work.
We mark the level at which we are going to mount the shelf.
I am going to make a shelf of 73cm by 27cm.
We cut a channel at 120cm. Now we mark 25cm at one end and at the other.
We make some cuts in the marks to be able to bend the channel there.
We place the channel on the laser line and drill in the middle so that it stays on.
We are going to drill just on the two edges of the channel. That will make our shelf strong.
Now we screw. We must use good plastic plugs.
We cut some pieces of upright to reinforce in the center.
Cut the front channel and place it.
Thanks for your support.
If you like my content and you are not yet subscribed, what are you waiting for?
We check that it is well level.
If it is necessary to readjust the level in the front part, we can do it by inserting some wedges behind the channel that was screwed to the wall.
We put the sides square and fix them.
If you are interested in these products, please look at the description.
We check that it is the same size on both sides and fix the profile.
We take out a measure to cut the plasterboard.
Before placing the plates, I will show you these three AliExpress products.
Thanks to AliExpress for this collaboration. In the description you can find the links to the products.
Let's go with the placement of the plates.
We screw both into the channel and into the stud. That will give you even more resistance.
We can screw right where the stud intersects with the channel.
We measure the width of the edge to cut some strips of plasterboard.
We put it on and screw it on.
With a handsaw we cut off the excess.
Now we put the ones on the sides.
List our shelf. It would only be pasted.
In this video you can see another assembly of shelves with plaster.
I remind you that you can find the links to the products in the description.
If you liked this video, don't forget to click LIKE and share it with your friends.
Do you want to know every time I upload a new video of crafts, tricks, decoration ideas, inventions and some other interesting and fun things? So don't forget to subscribe to my channel :D
Hashtag: #AliExpress #AliExpressSuperhaul #AliExpressHome