etrailer | Trailer Hitch Installation - 2007 Acura TSX - Curt

Click for more info and reviews of this CURT Trailer Hitch:
https://www.etrailer.com/TrailerHitc...
https://www.etrailer.com
Don’t forget to subscribe!
/ etrailertv
Full transcript: https://www.etrailer.com/tvinstallt...
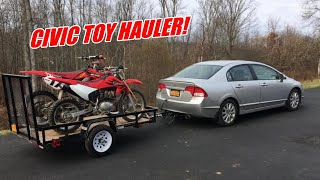
Today on our 2007 Acura TSX we're going to take a look at and also show you how to install the CURT customfit class 1 trailer hitch receiver. This offers the 11/4" by 11/4" receiver tube opening opening. Its part number is C11455. Here's what our hitch is going to look like installed. See we've got our square tube that comes across from our side plates here. It's going to meet at our receiver tube opening. This is an 11/4" by 11/4" opening.
It's a class 1 hitch, so you'll be able to use your smaller cargo carriers, your 2bike racks, small ball mounts if you want to haul a little trailer around or something like that. They can be pretty versatile. Now when it comes time to secure all of your items in place you got a 1/2" pinhole here on the side. You want to choose an accessory that's rated for class 1 use, but you can see there's plenty of room around it for whatever type you might want to use, whether it's a just a pin and clip, maybe a locking hitch pin, or even antirattle device. The reinforcement collar here around the end, you can see it's nice kind of a flush steel look. I think it looks nice on the back.
Then we've got platestyle safety chain connection points that are going to come around, ovalshaped hole on each side. Shouldn't have any issue getting chains connected that you might want. When it comes to weight capacities for the hitch it's going to give us a 200 pound tongue weight rating. That's the maximum downward force we can put her at the receiver tube opening. It gives us a 2,000 pound gross trailer weight rating.
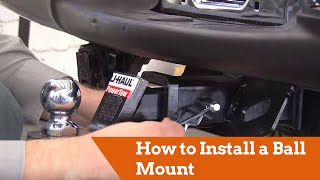
That would be the total weight of our trailer and then anything that we we're going to load up on it. Of course it's a class 1 hitch so it's not rated for use with weight distribution, so you don't want to do anything with that. CURT does recommend the use of a stabilization strap with this hitch if you're going to hauling a nonwheeled load, so like your cargo carriers or your bike racks, anything really other than a trailer, you'll want to use that stabilization strap with. You'll also want to check the owner's manual on the Acura. You want to see what its tow rating is and go off of whichever of those numbers are the lowest. Now a couple of measurements that you'll find helpful when it comes time to select your ball mount, bike rack, or hitch cargo carrier will be from the ground to the inside top edge of our receiver tube opening we've got about 123/4". Then from the center of our hitch pinhole to the outermost edge of our bumper it's about 21/4".
With the inside top edge of the receiver tube opening being under 13", we do recommend the use of products that have a raised shank just to provide you with better ground clearance. Now to begin our installation we need to lower down the exhaust so we can gain access up to the attachment points. On each tailpipe section we've got an exhaust hanger that's going to be closer to the middle towards the rear, and then caddy corner from that we've got one located up here on the front closer to the outside. Now before we remove these I'm going to use a cam buckle strap and just go underneath the exhaust and give us some support. If we don't have quite enough room to get the exhaust down, we'll have another hanger right up here we can remove, but we'll only take that one off if we need to. You want to use a little bit of spray lubricant on these hangers to help them slide off. Then you can use a large screwdriver or a pry bar. You just want to pop up behind in there and they'll come off for you. Now I'll just let out a little bit of slack here and you'll see our exhaust will come down, give us plenty of room to get in there and work. Now we're going to have our heat shields to take off. We got one on each side. There's four bolts. 10mm socket is what you'll need for it. Now the two attachment points we're going to be using for our hitch going to be the predrilled hole that's located between the two larger holes above our exhaust, and if we come right back to the frame rail here, got one more right there. Now in order to get these in place, we're going to have to fishwire our hardware, which is going to be a carriage bolt and a squarehole spacer block, up into position. The bolt fits fine in and out. The spacer block, you'll see it's close but not quite. What we want to do is just either use a file or a rotary tool and just take one edge off of that just slightly. Now we're going to take our pull wire and we're going to start with our hole closest to the rear here. Just want to push it back towards the forward hole there just so that it will come out of the bottom for us. Then we can slide on our spacer block. W