etrailer | Trailer Hitch Installation - 2006 Acura TSX - Curt

Click for more info and reviews of this CURT Trailer Hitch:
https://www.etrailer.com/TrailerHitc...
https://www.etrailer.com
Don’t forget to subscribe!
/ etrailertv
Full transcript: https://www.etrailer.com/tvinstallt...
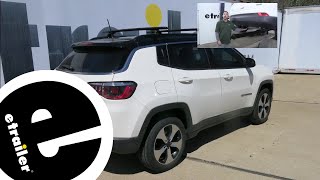
Today in our 2006 Acura TSX we will be reviewing and installing the CURT Custom Fit Class 1 Trailer Hitch Receiver, part number C11455. This is what our hitch will look like once it's installed. It's going to have that nice sleek look and lowprofile drag against the back side of the vehicle. You're going to see that the angled brackets down here on the bottom will come down along the bottom to help give you a little bit of extra support. It's going to be fully welded all the way throughout. It's going to have that black powder coat finish that's going to help prevent any kind of rust and corrosion as well as your chain tiedowns and one and a quarter by one and quarter inch receiver tube with a half inch pinhole going all the way through. This hitch is going to be capable of 200 pounds, ton weight capacity, and 2,000 towing capacity.
Weight distribution is not recommended with this receiver. Next let's go ahead and give you a few measurements to help you in selecting accessories for your receiver hitch. From the center of the pin hole to the outermost edge of the bumper is going to be about 2.5 inches. From the top of the receiver tube to the ground is going to be about 12.75 inches. First thing we want to do, we're going to place the safety strap over the exhaust so when we pull off the hangers it doesn't drop down too far. We'll just go ahead and use a generic cam buckle strap to do so. Next we'll go ahead and remove the rubber isolators for the exhaust.
Go ahead and take a little bit of spray lubricant to help you guide them off. There's going to be one located here on both sides and then one directly on the backside on both sides. You should be able to simply slide them off once you've lubed them up. Now we'll go ahead and remove the front ones. You can loosen it up as needed to help give you a little bit more room.
Next step is going to be to remove the heat shields. Locate the four bolts securing each heat shield for removal. Go ahead and use a 10mm socket to remove them. We'll go ahead and repeat that same process on the driver side and set the heat shields off for installation later. Now with our heat shield removed, all of our access holes and hardware holes will be visible. The access holes for the hitch, for the hardware, is going to go in these holes here.
The access hole is going to be this rear hole. First thing we're going to need to do is enlarge that hole. We're going to use the prying method. Place one pry bar up there, place the other one going the other direction, and squeeze them together to widen the hole. Once you have the whole widened, we'll go ahead and test it out with your block by fitting it into the hole. Once you can get it through the hole, you'll be perfectly set to go ahead and fish through your fish wire. Starting from the rearmost hole, we'll place the coiled side of the fish wire up in and back towards that access hole that we just made. If you need to, you can place a little bin in the bottom side so that when you get it close to the access hole, you can rotate it around. Once you have it out the hole, we'll go ahead and get our spacer block and our first bolt. Go ahead and hold the end of the fish wire so you make sure that you don't push it into the frame. Place the block through the hole that we just widened out, then thread on your carriage bolt to the coils. Once you have it threaded on, we'll then go ahead and pull it up and into the frame and out the rear hardware hole. Go ahead and unthread it, make sure that you do not damage the fish wire by pulling it off until you get all the bolts through the holes since there's only one included in your kit. Then we'll repeat that same process for the hole located here. You'll need to make a sharp bend in your fish wire to make it easier for you. Place the block over, through the hole, and then your carriage bolt threaded onto the end. Pull through the frame and out your hardware hole. Go ahead and remove the fish wire and repeat that same process on the passenger side. Now we'll go ahead and position our hitch. We're going to have to place the passenger side up first and into position. Bringing it over the top of the exhaust, and then sliding in our driver's side. Once you have the hitch into place, we'll go ahead and raise it up over the provided hardware making sure that you don't press it into the frame. Take your hex nuts and thread them on. Now we'll just go ahead and tighten them down before we torque them. Use an 11/16 deep well socket to do so. Now we'll go ahead and torque down the nuts going through the hitch to manufacturer specifications. Now we'll go ahead and replace the heat shield. Note t