etrailer | Trailer Brake Controller Installation - 2002 Chevrolet Silverado 3025-P

Click for more info and reviews of this Tekonsha Trailer Brake Controller:
https://www.etrailer.com/Accessories...
https://www.etrailer.com
Don’t forget to subscribe!
/ etrailertv
Full transcript: https://www.etrailer.com/tvinstallt...
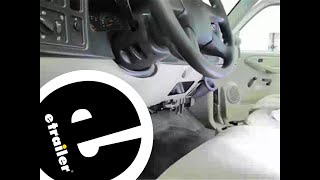
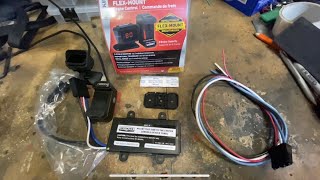
Today on our 2002 Chevrolet Silverado we'll be installing the Tekonsha Prodigy P3 Trailer Brake Controller, Part Number 90195. In addition to the P3 Brake Controller, we'll also be installing the Tekonsha Plugin Wiring Adapter for electric brake controllers for GM vehicles, Part Number 3025P. We're going to first begin by installing the Tekonsha Wiring Adapter. We're going to need to remove this cover right here. We're up underneath the driver's side near the pedals. We'll need to remove this cover on the fuse box here. Go ahead and remove this plastic nut.
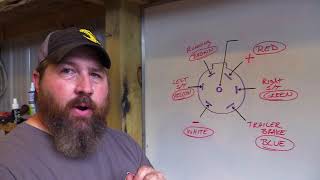
When you look on the underside of the cover, we're looking for the trailer sixway plug. It's this one right here. We'll be taking the plug and plugging it in just like that. Go ahead and line it up and push it all the way in place making sure that the locking tab clicks down into position so it secures it. When we're done with that we can go ahead an put our cover back in place. Next we'll go ahead and take the other end of our wiring hose and we'll route it over to where we're going to mount our brake controller.
Use a couple of zip ties to help secure the wire. We're going to mount our brake controller over in this area. To do that, we're going to go ahead and use the metal bracket that comes with it. We're going to actually screw into this metal lip down here. We'll be using a couple of these screws here. We'll go ahead and drill a pilot hole.
Go ahead and take our screws and attach our metal bracket here to the underside of the dash. Next we're going to go ahead and take our wiring harness before we connect our brake controller. We're going to connect it to the back side. Want to make sure that the locking latch here is on the top. It'll catch right there on that little tab. Go ahead and line it up, and then we'll push it into place making sure it's secure.
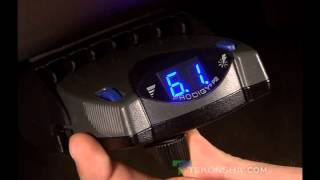
We'll then go ahead and take these little machine screws. They'll thread in on each side of the brake controller and hold it to the bracket. We'll go ahead and take a few zip ties to help secure up any excess wiring. Now with our wires secure, we can go ahead and trim off any excess zip tie. Without your trailer connected, when you do the manual override on the underside, you'll notice that it says, "No trailer connected." We'll go ahead and plug in our tester, which will act like our trailer in this case. With our trailer plugged in, you'll see that we have a zero zero. Either by stepping on the brake pedal or in the manual override, our brake controller is working properly. Change the maximum output setting by the upanddown arrow. As you can see, you can change the background, the color, the brightness, the contrast. There's multiple different functions of this brake controller than you can change. It also has different boost levels, as well as turning the boost feature off. The boost level is basically how aggressive you would like the trailer brakes to come on. The higher the boost setting, the more aggressive the trailer brakes will be applied. That'll do it for our installation of the Tekonsha Prodigy P3 Trailer Brake Controller, Part Number 90195, in conjunction with the Tekonsha Plugin Wiring Adapter for electric brake controllers for GM vehicles, Part Number 3025P, on our 2002 Chevrolet Silverado. .