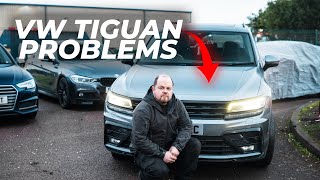
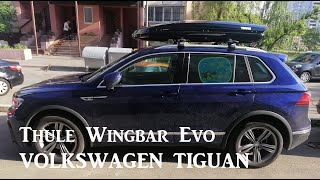
etrailer | Thule WingBar Evo Crossbars Installation - 2018 Volkswagen Tiguan

Click for more info and reviews of this Thule Roof Rack:
https://www.etrailer.com/RoofRack/Th...
https://www.etrailer.com
Don’t forget to subscribe!
/ etrailertv
Full transcript: https://www.etrailer.com/tvinstallt...
Hey everyone, Colin here at etrailer, today we have a 2018 Volkswagen Tiguan, and we're going to do a test fit of the Thule wingbar Evo roof rack system. Now this roof rack system was designed to mount to the raised side rails of your Volkswagen Tiguan. It's going to allow you to get your favorite rooftop accessories loaded up, whether you've got a cargo box, a bike rack, or even a kayak carrier. Up top, we have our wingbar Evo crossbars, these are going to be 53" long, it's going to be a lot of storage space on top of your roof. We're also going to have a little bit of overhang on each side, so if you wanted to get a smaller accessory, like a bike rack loaded on the outside, you have that option as well.It's going to have a nice aerodynamic shape to it, that's going to help cut down on wind noise and drag, especially when compared to your standard square or round bar roof rack system. What's nice is that the cap just flips up like that to access the TTrek, we don't have to pull the end cap all the way off, we just flip over that little part.
And what's nice about these wingbars is that we don't have to pull the rubber strip out and cut it to length anymore when it comes to mounting our Tslot accessories, we just slide it in between each strip to the location we want it on our crossbar, tighten it down, and then we can close up our end cap.Now what we have connecting our crossbars to our raised side rails is the Evo raised rail feet, these feet basically just clamped down onto the raised side rail, provide a nice good hold for our roof rack system, we've got nice rubber coating all the way around to make sure we don't harm or scratch our side rails. Now we'll take off that end cap, come off very easy, we can access the tightening bolts right here, which is what secures it down to those side rails.We also are going to have plastic locks on all four of these end caps, We can replace those with the one key system from Thule, That'll provide more security for your roof rack, so someone needs the key to be able to remove it. Now, I want to provide you guys with a few measurements to give you an idea of the spaces roof rack will take up, first from the top of our roof to the bottom of our wingbar, it's going to be 2,5", that's going to be plenty of space to get any clampon accessories around your crossbar without risking damaging the top of your roof, I will advise you to still be a little bit careful, you don't want to just set your stuff on there, that you still want to be careful and make sure you don't scratch your roof.Now, if we go from the top of our roof to the top of our wingbar, it's going to be 3,5", that's something to keep in mind that you have that added height to your roof for any low clearance situations. Now, if you're a Volkswagen Tiguan has a sunroof, you're still going to be able to open it up with this roof rack system installed, it does come kind of close, so if you have any accessories where the clamps do reach a little bit under your wingbars, You just want to be mindful of that when you're trying to open your sun roof.This roof rack is going to have a weight capacity of 220 pounds, that's a step up from the previous airplay setup. Now you always want to be sure to double check with your Tiguan owner's manual, as well as the accessories and make sure that your roof can handle that weight.
Now that we've gone over some of those features, let's show you guys how to get this installed. Now we already have our front crossbar installed, it's pretty easy to get assembled and installed, the rear one is going to have the same process to it, real quick how we got the first one installed was, we just picked a point on our raised side rails and measured from that point, I just picked the edge of this black piece right here, went to the edge of my foot and then did the same on the other side, then I tightened everything down.Like I said, it's going to be very quick and easy, we'll just flip our wingbar over, we're going to come down to the end cap and then remove it, push in that tab, pull it off, we'll grab our raised rail foot right here, with little tab right here, it's going to go into the channel on the backside of our wingbar, just like that. We'll put the end cap back on and just like that we're ready to get on our roof. Now, if you have a height restriction, don't be afraid to climb up on the backdoor seat, but if you can see it, just get over that raised side rail and the other side we'll do the same for this side. There's no specific spot we need to put it, from here we're just going to measure our crossbar spread, you can kind of base it off of whatever access