etrailer | EcoHitch Class III Hidden Trailer Hitch Installation - 2023 Volkswagen Tiguan

Click for more info and reviews of this EcoHitch Trailer Hitch:
https://www.etrailer.com/TrailerHitc...
https://www.etrailer.com
Don’t forget to subscribe!
/ etrailertv
Full transcript: https://www.etrailer.com/tvinstalle...
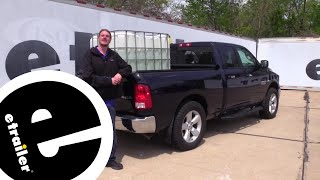
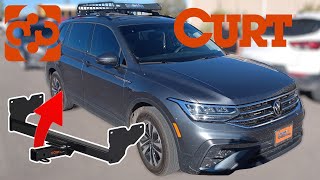
Hey guys, this is Jake here with etrailer. Today we have a 2023 Volkswagen Tiguan and we're gonna show you how to install the EcoHitch twoinch hitch receiver. Adding a twoinch hitch receiver to your Tiguan is gonna give you many different options to be able to carry bike racks, tow a small trailer, carry a cargo carrier to be able to get more of that gear to and from your destination. Now, other than the usefulness itself, I really like the fact that the EcoHitch is gonna be hidden up behind the bumper and the hitch receiver tube itself is the only thing that you're gonna see. In addition, you're going to get a mounting bracket for your wiring if you so decide to put in either a four pole or a seven pole. The hitch pin hole is going to be a standard fiveeighthsinch hitch pin.
The paint on the outside is a very, very nice powder coat. It's really tough. The safety chain loops are going to support many different styles of hooks, so that you can hook up whatever trailer you have. This trailer hitch is gonna have a max tongue weight capacity of 750 pounds. And a max gross trailer weight rating of 5,000 pounds.
Now a few measurements for you guys is from the ground to the top inside of the receiver tube, it's gonna be about 15 and a half inches. So you should be okay with any standard cargo carrier. If it has a twoinch rise, it's gonna help you. A lot of bike racks are gonna be really well at that height. Twelve inches is about the height that you have to start to worry, so you should be just fine with the receiver tube itself.
Now as far as distance from the center of the hitchman hole to the outer edge of the bumper, it's gonna be about an inch. So not a whole lot to worry about. It does stick out a little bit, but I mean that is gonna be if you're running your leg across the bumper, otherwise you don't have to worry about hitting it. Now as far as the insulation goes, it is gonna be a little bit more involved because you're gonna have to remove the fascia, but it's because of that process that the hitch looks so good on the back of this Tiguan and I think it says a lot about the Tiguan itself is a very stylish vehicle. And the last thing you want is a bumper beam hanging on the backside to see that the hitch receiver itself.
So with that being said, let's go ahead and take it inside and show you how we did. To to begin our installation, and we need start by removing our four torx bit head screws that are holding our rear wheel well liner here on. We're using a T20 torx bit and it helps to have a small wrench like we have here in order to fit in this tighter space. And we're gonna do the same thing on the driver's side of the vehicle. Now keep in mind, most of the things that we're gonna do on one side of the vehicle will be the same for the other. Now on the inside of our bumper from the other side, we can pinch these factory connectors and we can take that black piece off. Well, these upper ones, they're kind of hidden behind the frame, so we can take a screwdriver, and push it in, and pop it out. Now, once we get this black border pulled back enough, you can access a T20 torx screw underneath each side that we'll need to remove. Now we need to remove several fasteners along the bottom edge of our fascia like this. (cordless screwdriver whirring) (cordless screwdriver whirring) Now, if you have this decorative piece here on the bottom, we're just using a socket to remove the plastic metal. Now, we'll just pull down gently and make everything, make sure everything's released. Now, we need to go inside the rear hatch of our car and you'll see a vent up here in the corner. We need to remove that vent in order to access a plastic wing nut. There's a little notch over here to get a plastic trim panel tool, or we may have to use a small screwdriver, or something in order to pry back on it. Got that out. And then, there's a plastic wing nut right there, and we'll take that off. This is gonna allow us to remove our tail lights and then we can unclip the harness from the back. Take our screwdriver, grab this red tab, pull it out push our connector in and then pull our taillight out. Before we go and pull our rear fascia off, we're gonna take some tape and line each side of this joint, so that if we, when we go to pull it off, we don't risk scratching the paint. Now, we need to take a trim panel tool and pull back on our fascia here, and you'll see these tabs. And we need to slowly unclip each one as we go down the line here. And you can see 'em here a little bit easier on the top, and it helps to have an extra set of hands on the other side