etrailer | Draw-Tite Sportframe Trailer Hitch Installation - 2020 Toyota Corolla

Click for more info and reviews of this DrawTite Trailer Hitch:
https://www.etrailer.com/TrailerHitc...
https://www.etrailer.com
Don’t forget to subscribe!
/ etrailertv
Full transcript: https://www.etrailer.com/tvinstalld...
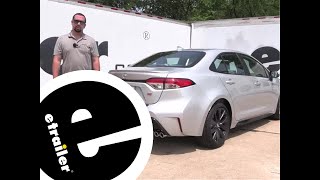
Hey, everyone, Shane here with etrailer.com. Today on our 2020 Toyota Corolla, I'm gonna walk you through how to install a DrawTite Class One Trailer Hitch Receiver. Class one hitch is gonna be designed for light loads, for instance, bike rack. You have a couple of bikes, tired of loading 'em in the trunk of the car, you wanna put something outside, but you don't wanna buy something you have to load 'em up on the roof. This is gonna allow you to install a bike rack, easily install your bikes on the rack. Keep in mind, with it being a class one hitch, you're gonna be limited up to a twobike bike rack.
Maybe you wanna put a cargo carrier on, get items from inside, put 'em on the cargo carrier, make a little bit for room for your passengers. Keep in mind, putting the cargo carrier on, you don't wanna exceed the tongue weight of the hitch, which we'll get to in just a little bit. Can also pull a trailer, keep in mind, trailer load's gonna be very low as well. With our hitch installed, you can see our cross tube is completely underneath our vehicle. It's tucked up nice and close to the bottom of our fascia.
We're really not gonna be able to see it too much from the back of the vehicle. Receiver tube opening, inch 1/4 by inch 1/4. So, it gives us a few different options for hitch mount accessories. We're gonna have rolled steel, safety chain loops and very large openings that will accommodate different size safety chain hooks. Our hitch pin hole here is gonna be 1/2 inch in diameter, gonna take a standard 1/2 inch hitch pin.
Hitch pin and clip does not come with this hitch, however, it can be found here at etrailer. The hitch itself is gonna be your steel construction with a black powder coat finish, really gonna hold up well against rust and corrosion. From the center of our hitch pin hole to the outermost part of our bumper fascia is gonna be about four inches. That number's important for any of your hitch mount accessories that may fold up against the vehicle like your bike racks and cargo carriers. You wanna make sure they're not gonna make contact.
From the ground to the top innermost part of the receiver tube is gonna be about 10 inches. Keep that number in mind for any of the hitch mount accessories that may require a little bit more ground clearance. As far as our weight capacities go, we're gonna have 200 pound max tongue weight, that's the downward pressure on the inside of the receiver tube. So, when you're putting a cargo carrier on, bike rack, you wanna make sure you're not exceeding that. We're gonna have a 2,000 pound gross trailer weight, that's the trailer plus the load included, that's how much the hitch can pull. I always recommend checking the owner's manual of the vehicle to make sure the vehicle can withstand that amount of weight. You're gonna go with the lowest number between the vehicle and the hitch. Now that we've gone over some of the features, let's walk you through how to get it installed. For our installation, we're gonna take a strap. You can hang it pretty much from anywhere, I like to hang it from the springs. We're gonna run it underneath our exhaust. And we're gonna come back, we're gonna remove this isolator and this isolator, and if we need more room, we can remove this third one up here. For our rearmost exhaust, here, we're gonna take a 1/2 inch socket, remove the two bolts that are up in the frame rail. If these bolts don't come loose right off the bat with an impact, use a socket wrench, pop 'em loose and then you can use an impact to get 'em out the rest of the way. For our second and third one, we'll use a pry bar and we're gonna pry off one end. What I suggest doing is spray with some lubricant, soapy water works pretty good. I'm gonna wedge it in there. Okay, and we're gonna repeat the same thing for this third one. One that I didn't see, you're gonna have a fourth one here by the rear tire to the outside of your muffler, front side of it, and you're gonna remove it the same way you did the front two, pry bar and we'll just pry off the end. Next, we can use our strap to slowly lower our exhaust. Still supported. Once we get it lowered enough, we're gonna come up and we're gonna remove our heat shield. All three bolts, one here, here and one there. We'll use a 10millimeter socket to remove those. Pull that out. Now, we need to trim our heat shield. You'll notice the arrow, direction it's facing. Where this rolls up, we're gonna go over three inches and then down to this end. To cut it out, we're just gonna tin snips. Next, take a flathead screwdriver. We're gonna pop out this plug. And the ceiling here that runs across the sea