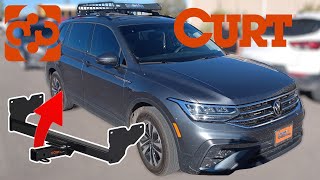
etrailer | Curt Trailer Hitch Installation - 2023 Volkswagen Tiguan

Click for more info and reviews of this CURT Trailer Hitch:
https://www.etrailer.com/TrailerHitc...
https://www.etrailer.com
Don’t forget to subscribe!
/ etrailertv
Full transcript: https://www.etrailer.com/tvinstallc...
Hello, neighbors, it's Brad here at etrailer. And, today, we're taking a look and installing the Curt Class II Trailer Hitch Receiver on a 2023 Volkswagen Tiguan. The great part is it's a hidden cross tube, meaning the only thing you're really gonna see exposed from your vehicle is gonna be the 1 1/4inch receiver tube opening. Now being a smaller size than the standard two inch means that you're gonna be a little bit limited when it comes to ball mounts, bike racks, or cargo carriers. But I have one of these on my vehicle as well, and it hasn't stopped me from being able to get accessories for it. You'll just have to make sure that you are picking it up for a 1 1/4.
Now all of those accessories are gonna stay in place with a 1/2inch pin and clip, which is not included with the hitch. A lot of times your accessories when you pick those up will come with one. But if you want to get a locking version, we have plenty of options available here at etrailer, which is really nice if you plan on leaving your accessories on, you can lock that in place and know that no one's gonna walk away with your accessories. We have a rolledstyle safety chain loop here, which makes it super easy if you plan on pulling a trailer to put your standard S hook or even a larger clevis style on here. Now speaking of towing, this is a class II, so generally your inchandaquarters are pretty low weight, but the class II gives you a little bit better towing capacity.
And this one comes in with a gross trailer weight rating of 3,500 pounds. That's gonna be the weight of the trailer, plus the accessories loaded onto it. Your tongue weight rating is gonna be 350 pounds, which is gonna be the downward pressure that's put on the inside of the receiver tube opening. So that's gonna be a lot of your bike racks or cargo carriers, anything that's gonna be suspended. Now that's a decent weight capacity.
You should be able to get two bikes loaded up on a bike rack or a cargo carrier loaded up on vacation, and not have an issue. But if you plan on towing, you're gonna want to check the vehicle's owner's manual to see what the vehicle's capable of towing, and then compare that with the hitch numbers, as well as any components you'll be using, take the lowest of those numbers so you stay safe. Now many accessories will stow in a folded up position, which can get pretty close to the rear fascia. So from the center of our hitch pin hole to the furthest point of the rear fascia, we're coming in about 4 1/4 inches. That's gonna be important when choosing those accessories to see where it's gonna fold up.
You wanna make sure you're not making contact scratching your fascia and that you can actually put it in that position. Now keep in mind, even if it clears, you're probably not gonna be able to open up your rear hatch with those in that stowed position, but if you're using them, not a problem. Now as far as ground clearance goes, this one comes in at right about 13 inches, and that's gonna be important not only for choosing accessories to give you a little bit of extra wiggle room from them dragging on the ground, but also picking a ball mount that you can determine whether you need a rise or drop by measuring the coupler of the trailer, and then comparing it with that height, and then you can figure out that rise or drop. Now keep in mind with your suspended accessories, like cargo carriers and bike racks, it's gonna extend past the vehicle. So as you go up an incline, those are gonna get pretty close to the ground. Mostly is important when going up steep inclines or on rocky or rough terrain, but the ground clearance is fairly decent on this. I'm gonna walk you through all the steps to make sure you get yours installed. So let's take a look at that and get your hitch installed. To begin your installation, we're gonna go ahead and remove this underbody shroud. Now it's just gonna be a series of Torx bits. A T25 is gonna get these removed. You might wanna have a nice, organized spot to keep your hardware, that way for reinstallation you'll have all that necessary. But this is going to actually not get put back in place, it's gonna give us that clearance for our hitch to live. So we'll start here at the corner and get this one removed. (drill whirring) And then, if you just kind of work your way along the bottom here, we'll go ahead and get those removed as well. (drill whirring) Now there's also two plastic nuts that are holding these in. You can see the kind of notch, you're gonna want to use an extension to gain access to those. We'll go ahead and get those removed. (drill whirring) Now