etrailer | Curt T-Connector Vehicle Wiring Harness Installation - 2020 Jeep Compass

Click for more info and reviews of this CURT Custom Fit Vehicle Wiring:
https://www.etrailer.com/CustomFitV...
https://www.etrailer.com
Don’t forget to subscribe!
/ etrailertv
Full transcript: https://www.etrailer.com/tvinstallc...
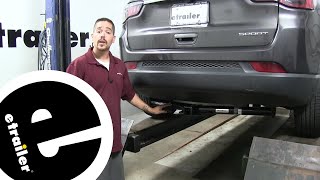
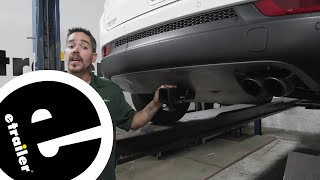
Hello, neighbors. It's Brad here at etrailer. And today, we're taking a look at a CURT trailer wiring kit on our 2020 Jeep Compass. Now, this is gonna allow you to hook up to your trailer with the connection, allowing you to stay safe and legal. Now, you can run this out of your vehicle, but we chose today to keep it in the vehicle. So with our fourplug hole, this will give us running lights, brake lights, and our two turn signals.
And that way, people behind you can see what you're doing while pulling the trailer. Installation is pretty straightforward. Essentially, what you're doing is attaching to your existing brake lights, and then there's a T connector. Now, that's gonna connect to a module and you're also gonna run to your other side. From there, you're gonna have a ground and a power wire that you're gonna run to your battery.
So it may seem a little overwhelming, but step by step, I'll walk you through the installation. So now, let's take a look at that. To get our installation started, we're gonna open up the hatch and we're gonna take off this center garnish, and that's gonna allow us eventually to get to these taillights so we can plug them in. So first things first, you have one on each side. So using a trim panel tool remover or a flathead screwdriver, we can simply pop that up, and that's gonna show you that there's a T30 Torx bit there.
So go ahead and remove that. Go ahead and set these aside somewhere safe and that way, you have them for later. Next, we're gonna lift our cargo carrier up. Let me get and set this up. So you're gonna see one, two, and then on the other side, three total Torx bits here, and I'm using a T20.
So go ahead and remove those. So with those three removed, we're gonna remove the center garnish. And that's gonna just kinda take a little bit of prying up and there are clips, so just be careful not to break them and work from the outside in. And that should pop up. Now, before you pull too hard, there is this sensor here and you're gonna want to unplug that. Purple clip slid back, that should pop out. Now, to continue removing panels. We have this little cubby here. We're gonna just pop this out and that's gonna give us a handhold while pulling this out. Now, again, same thing. There are clips. So just take your time, be careful, and work your way kind of out and then towards the center portion. So as you can see, it was a little bit of a struggle. Take your time. You don't wanna overbend the plastic because then it can cause a crease and it's kinda permanent. So again, be patient with it, but just kinda work your way back. So underneath this cubbyhole, you're gonna feel a rubber grommet. We're gonna pop this out. Just work your fingers around the edges of it. So I've used a strap to kinda keep our plastic pulled back 'cause we're gonna be accessing back here. And where we pulled that grommet from, that's just the passthrough from the wires in the inside to the exterior of the vehicle, which is gonna route to our taillights. So we'll come back to that and run our wire through it. But for right now, I'm gonna get our taillight off. So with a flathead screwdriver, you can see there's a slight little groove at the top. You just kinda pry in there and put your flathead in, a little twist, and then you're gonna see a T30 Torx bit. And so we'll go ahead and loosen those up. Next step is gonna have the taillight being popped out. So kinda give it a quick wiggle and pull straight back. So using this whole, mainly I was able to pull that. So you're gonna see this is where we have our wiring. So from here, I'm gonna unhook this and set my taillight aside. So with my wiring kind of laid out here, we do have our yellow, brown, and our ground wire. And what I'm gonna do is I'm gonna peel this back just a little bit. And that grommet, this is gonna pass through the grommet and then through a cavity up to this plug. So what I'm gonna do is pull the grommet back with a gap. And right now, I have an air line and this is gonna fish up and be my pull wire for those plugs to get to here. So I'll pull this here, and with the grommet pulled back, I can see down in the cavity this air line. And if you don't have an air line, you can use a string from the top side with a weight or a coat hanger or something along those lines. So now, you can see this is pulled up. So I'm gonna tape my plugs to this, and then we'll pass those through. So with my plugs electrical taped to my air line, I'm gonna feed this through. I'm gonna have to pull the grommet back just a bit to kinda create some space for it. Just slowly work your plugs up and take