Combo Dado Blade Inserts and Sizing Gauges

This zeroclearance Dado blade insert set creates clean cuts, serves as a sizing gauge, and shows the “recipe” for assembling the Dado stack. DirtFarmerJay explains!
#dadoblade #dados #tablesaw #tablesawblade
The standard insert supplied with many table saws, especially “contractor” models, works for rough stock but is pretty worthless when making fine cuts with better blades. That’s because the slot in the insert that the blade protrudes up through is wider than the blade, so the cut is not supported, leading to chipping.
The slot must be wide to accommodate the tilt function that allows the blade to set at any angle up to 45 degrees. That’s necessary, but it still doesn’t help get a great finish when using the blade set at 90 degrees.
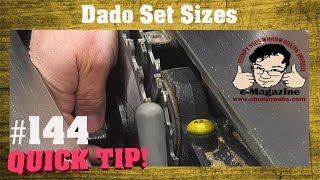
If a dado stack is put on the saw, the standard insert can’t be used as the stack will be wider than the slot. This is pretty easy to do. I use the standard insert as a pattern, and cut strips of ½” (13 mm) MDF the precise width of the insert and about 1” (2 cm) longer than the insert. I mark where the support tabs in the saw table are and drill and tap holes to install medium Allen screws for height adjusters.
The ends are marked using the insert, and the curves are cut slightly outside the line and then trimmed with a router pattern bit to the exact size. A washer or set screw is installed at the end of the outbound edge of the insert to stop the inserts from coming out of the table due to the upward rotation on the back side of the blade. Lastly, a fingerhole is made on the inbound end of the insert to make it easy to place and remove.
The insert is installed and the fence is moved over the edge slightly to prevent the insert from rising. The saw is turned on, and the blade is raised through the new blank insert, customizing it for that blade or Dado blade stack.
That’s just the beginning of a system that will serve you well. By dedicating an insert for each combination of Dado blade widths and rip, crosscut, and combo blades you have, each one will be a zeroclearance. So, label each one so they are easy to identify and put to use. I label both the face and one edge of each insert.
Next, start using the slots in the inserts as sizing gauges. Since the slot is exactly the width of the cut that the blade or stack will cut, you can now use the stock you need to cut for to see if it will fit in the dado, groove, or rabbet you will make for it.
Since we are on a roll, why not make this even better? Some of those dado stack combinations are “hardwon” to get precisely the width you need. So, make it simple to get the same dimension again by listing the “recipe” for the Dado stack right on the insert.
We now have about 10 inserts, clearly labeled with size and recipe to build that width cut in the insert. This has made it much easier and more accurate than how I used to do it.
The inserts are easy to make, so when I wear out an insert, it’s easy to make another one.
Next, I’ll make a box to install in my saw accessory cabinet that will hold all the inserts vertically, in ascending size order, with all the labeling facing out. But, that’s for another episode. When it’s completed, watch for it here:
COMING SOON!
JUST DO IT YOURSELF!