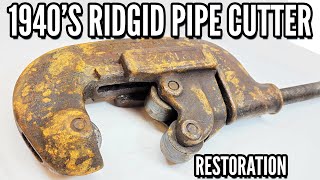
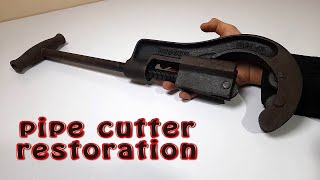
80-year-old Mini No. 00 Ridgid Pipe Cutter Restoration [Mini Restoration]

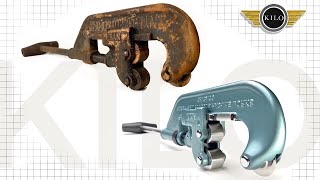
I bought this Ridgid No. 00 pipe cutter for $1 at a flea market. The rolls and feed screw were completely locked up and the cutter wheel was heavily corroded and severely chipped.
The small but mighty No. 00 cutter cuts piping between 3/16" to 11/8" OD. It was made by the Ridge Tool Company, otherwise known as the same Ridgid toolmaker you commonly see on store shelves and construction sites today. Although the patent dates for this No. 00 date back to the 1920's and 1930's, Ridgid relocated their operations to Elyria, OH in 1943. This probably puts the manufacture date of this pipe cutter in the 1940's or early 1950's.
For comparison, be sure to check out the MUCH larger Ridgid 12 pipe cutter restoration I did back in June: • Restoring a Crusty Ridgid Pipe Cutter
Timestamps:
0:00 – 0:54 Overview
0:55 – 2:45 Disassembly
2:46 – 4:36 Rust removal, sanding, polishing rollers and pins
4:37 – 6:20 Electrolysis/Rust Removal on feed screw and main body
6:21 – 6:48 Salvation!
6:49 – 7:09 Rubberizing feed screw knob
7:10 – 8:03 Cold bluing feed screw and pins
8:04 – 8:59 Sanding and polishing main body
9:00 – 9:30 Priming and painting
9:31 – 9:55 Cold bluing deburring tool ft. LEGO Rock Raiders
9:56 – 11:46 Reveal, Before/After
11:47 – 12:53 Testing
14:10 – 14:23 Thank you and please subscribe!
Restoration details and tips for restoring your own Ridgid (or any other brand) pipe cutter:
Disassembly is straightforward. The rollers and cutting wheel must be removed first before the bottom jaw can be brought up enough to remove from the main body. This is a typical disassembly of most pipe cutters. Take care in removing the pins – use heat if necessary to prevent damaging any thin cast iron cross sections like I did! In the event you break a unique piece like I did, don’t hesitate to look on eBay for parts for only a few dollars – you’d be surprised what you can find that will save you a massive headache of trying to braze or weld something back together. Use your favorite rust remover (Evaporust, vinegar, citric acid, electrolysis) to get as much rust off the parts before wire wheeling or wire brushing. Do not sand the roller/cutting wheel pins, as you will reduce the diameter and not create a tight fit when reassembled. You can lightly sand the rollers starting with 400 or 500 grit if you choose. The drill press technique shown in the video helps make sanding go quickly. For the main body/feed screw rust removal, a DIY electrolysis setup can be done like so: • Infinite Rust Removal? DIY Electrolys... . I use a modified laptop charger for all my electrolysis and it works perfectly. For casting/forging cleanup I decided to only remove the worst of it. I could spent days grinding and polishing all surfaces perfectly smooth, but in my opinion that takes away most of the character it has. I used Plastidip (black) for rubberizing the feed screw knob. A few light coats a few minutes apart does the trick. For priming, I use Rustoleum’s etching primer. For color I selected Rustoleum’s hammered finish in light blue – this is very similar to the original color. To produce a finer metallic effect instead of a hammered finish, spray in light coats at a distance of less than 12 inches.
Some of the tools and equipment I used in this video:
Camera: https://amzn.to/3EpbgOh
4" Bench Vise: https://amzn.to/3EgbSGb
Bench grinder: https://amzn.to/3rzbLlk
Catalyst Restorations may earn an affiliate commission when you buy through the links here.
Follow me on Instagram: @catalyst_restorations
#restoration #pipecutter #toolrestoration