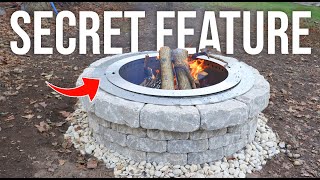
SUPER HOT SMOKELESS FIRE PIT - DIY Under $200! SLOWMO PROOF!

All materials here (prices as of video date):
$59.99 (1@$59.99) Fire Ring: https://www.tractorsupply.com/tsc/pro...
$73.14 (53@$1.38) Retaining Wall Stones: https://www.lowes.com/pd/4x8BasicHa...
$34.30 (35@$0.98) Wall Cap: https://www.lowes.com/pd/PavestoneRo...
$8 (2@$4) Gravel: https://www.lowes.com/pd/KolorScape...
$2 (4@$0.50) Bricks: https://www.lowes.com/pd/HollandPave...
$12 (1@$12) Furnace Cement: https://www.lowes.com/pd/OateyFurnac...
Total: $189.43
Timeline
Intro: 0:00
How it works: 0:18
Drilling the Ring: 1:32
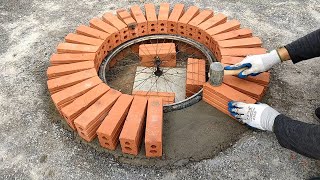
Building the Pit: 3:40
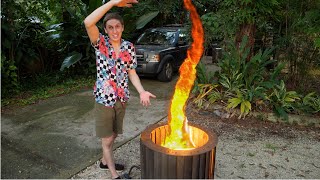
First Fire: 5:55
The Fix: 6:38
Second Fire 7:21
Outtro: 8:21
Some things I glazed over in the video:
1) The first fire will be to burn off the galvanization, which releases Zinc into the air that is toxic to your lungs. Please stand a few paces away when that first fire heats up. My ring was zincfree in about the first hour as I saw it flaking off the inside. To be safe, let the first fire burn all the way down and see if you have any shiny surfaces left before you get close to enjoy the next fire.
2) the little rocks inside the pit have not popped on me. I was told it may be an issue if the fire gets hot enough to make the rocks pop.
3) I let the cement sit for 10 days to dry before curing. Make sure to start a small fire to cure the fire cement (which I called mortar in the video). once you cure the cement for an hour or 2, you can crank up the heat to see the full effect. The big fire also burns off the galvanization. Don't breathe that stuff in! (edit: some comments have reported that their furnace cement seems to run off in the rain. I have cracks but nothing falling off yet. Your results may vary. Maybe just standard Type S mortar could be used? I was hesitant due to the heat but if the other stuff just melts in the rain, it might be our best bet.)
4) the secondary burn occurs once the pit has heated up. From a cold start, you will get some smoke and none of that cool flame at the top.
5) once the fire gets going, you can literally toss a log in anywhere and it lights right up. no need to carefully place a lot for the best burn, tho you certainly can! It becomes very self sufficient once its warmed up.
6) weeks later, I realized I probably should have put the lower holes a little higher, I think 3” up from the bottom edge would have been better. I did 1 1/2” in the video.
7) I really should have dug up the grass, laid down gravel and then placed the stones on top. Just laying stone on grass will result in the stones settling over time. I knew the consequences and was willing to redo it later. (Was really suffering from allergies the week I built this) edit: thanks David Bell for educating me that a root fire could be started where the fire spreads below ground and comes up elsewhere. Should really dig it up.
8) small fires are still pretty good in this pit. Little smokier but it works.
9) I think the bottom holes should probably be 3” off the ground. The rocks inside the pit plus ashes almost covered the hole after a few fires now.
10) this makes a big fire. For those looking to make smaller fires, try a smaller ring, but I am not sure how well the air hole spacing will work on smaller rings. There are some ongoing discussions with people trying different sizes and spacings to figure out the best arrangement for a 24" or 18" ring.
and lastly, don't forget to Like and share with your buddies! Get these nice fire pits going for some great time around a fire!
![DIY Smokeless Fire Pit [with a sealing strategy others missed!]](https://i.ytimg.com/vi/l15BEL4CjgU/mqdefault.jpg)