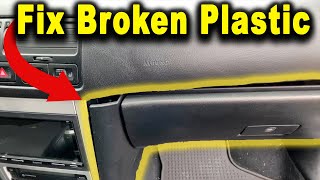
Steering Wheel Restoration - Cracked Steering Wheel Repair
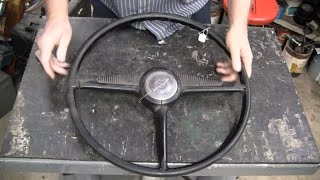
This steering wheel from the 1960's had developed a lot of cracks that left large gaps in the plastic. These cracked steering wheels are very common in cars from the 1950's and 1960's. The plastic that was used to make these steering wheels is a very rigid plastic. Thankfully, Polyvance's PlastiFix kit works great on the rigid plastics that were used to make these steering wheels. This video shows you how to use Polyvance's PlastiFix repair kit to restore cracked classic steering wheels.
Updated photo of steering wheel with rechromed horn ring: https://www.polyvance.com/images_old/...
Look below for links to some of the products from the video.
View this video on our website for more information and product suggestions for this repair: https://www.polyvance.com/video/plast...
Super Prep Plastic Cleaner: https://www.polyvance.com/Cleaners1/...
Plastic Magic Adhesion Promoter: https://www.polyvance.com/PlasticMag...
PlastiFix Kit: https://www.polyvance.com/PlastiFixK...
Hardset Epoxy Filler: https://www.polyvance.com/HardsetFil...
All Seasons EZ Sand Waterborne Primer Surfacer: https://www.polyvance.com/Waterborne...
All Seasons Waterborne Sealer (White): https://www.polyvance.com/Waterborne...
Other products used for this cracked steering wheel restoration:
Lazy Susan (You need to get this. It made the job much easier): https://amzn.to/2LbLHar
Chapters:
Intro: 0:00
The damage: 0:31
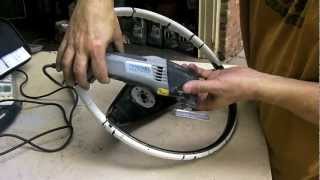
Removing the steering wheel: 0:41
Unboxing the PlastiFix Kit: 1:07
PlastiFix application technique (dropper method): 1:57
Applying PlastiFix: 2:30
PlastiFix application technique (mixing method): 3:46
Applying PlastiFix: 4:42
Grinding and sanding: 5:14
Mixing and applying filler: 6:36
Sanding: 6:54
Masking: 7:04
Cleaning: 7:33
Applying adhesion promoter: 7:55
Applying primer surfacer: 8:26
Filling in the gaps: 8:38
Sanding: 9:12
Cleaning: 11:03
Applying adhesion promoter: 11:14
Applying sealer: 11:39
Applying spot putty: 12:08
Mixing and spraying paint: 12:38
Closeups: 14:30
Reinstalling: 14:40
⚠ Important ⚠
Always wear proper safety gear while working!
The length of this video is in no way representative of the actual time required to perform a complete repair and therefore should not be used for estimating purposes.
✅ SUBSCRIBE to our channel for updates on our products and tutorials!
VISIT us at http://www.polyvance.com
EMAIL us at [email protected]
CALL us at 18006333047
✉ SIGN UP for our email newsletter at https://omniform1.com/forms/v1/landin...
Follow us on social media:
Facebook: / polyvance
Instagram: / polyvanceofficial
TikTok: / polyvance
LinkedIn: / polyvance
Browse our products:
Best sellers: https://www.polyvance.com/BestSellers/
Newest products: https://www.polyvance.com/NewProducts/
Check out Polyvance's plastic welders and welding rod:
Nitrogen welders: https://www.polyvance.com/NitrogenWe...
Hot air welders: https://www.polyvance.com/HotAirWel...
Airless welders: https://www.polyvance.com/AirlessWel...
Plastic welding rod: https://www.polyvance.com/WeldingRod...
Music Credits:
"Super Friendly" Kevin MacLeod (incompetech.com)
Licensed under Creative Commons: By Attribution 3.0 License
http://creativecommons.org/licenses/b...