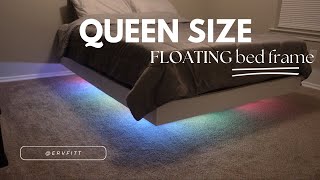
Queen Size DIY Floating Bed Frame

ADDITIONAL SIZE BED FRAME MEASUREMENTS PROVIDED BELOW.
Instagram: Curtis_Made_It
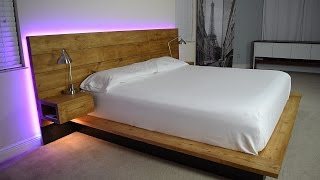
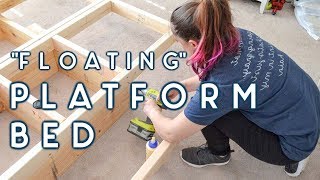
So glad you’ve made it this far, I just can’t tell you how easy it is to make your bed look like this for about $120(October 2019), depending on your sources for materials.
You are going to need: *SEE UPDATE BELOW*
UNTREATED BOARDS
*132x6x8 (actual measurement 1.5”x5.5”)
* 4 Simpson Strong Ties (2.5’s)
*1 lb. box of 3” screws
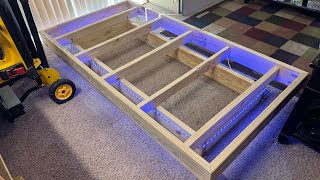
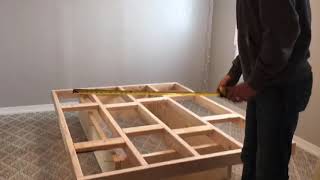
BED FRAME MADE FOR **QUEEN* SIZE BED, MEASURING OUTSIDE DIMENSIONS AT 60”x80”, MADE TO BE FLUSH WITH THE BOX SPRING.
**FOUNDATION**
2 @ 36” {head and foot}
2 @ 65” {sides}
3 @ 33” {supports}
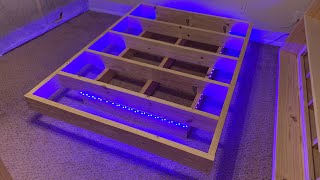
(As seen in time lapse) Screw in from the front of the head and foot board ((36” each)){labeled this for perspective}) into the side boards 65” ea. Measure from the outside, on the edges to line up with the side boards, to 18”, 34”, & 50” and place a mark for the spacing on your support boards inside of your foundation. Screw your support boards in to the center of these marks. This spacing provides 18” from the head and the foot, with 16” spacing in the two gaps in the middle to provide support for bodies that are sleeping.
LED light strips come with an adhesive backing. I didn’t use this and instead for flexibility I simply used scotch tape to attach the lights to the foundation. This allows me the ability to remove them easily if I move.
This may be somewhat out of order, but attach your frame braces (2”x4”, cut to 10” each) to the inside of your foundation. See my King size floating bed frame video to trade these 2x4 pieces for Simpson Strong Ties. Amazon links are commissioned. If you click on any Amazon links in the descriptions of my YT videos and make a purchase, I will get a commission. This is one way you can help support my channel and please know that I only link to products that I actually use myself.
Lights:
https://www.amazon.com/gp/product/B08...
**BED FRAME**
2 @ 60” (head and foot)
2 @ 77” (sides)
4 @ 57” (supports)
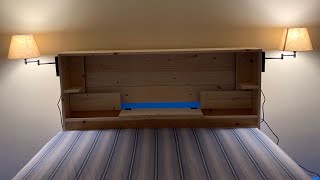
Measure your head board 12” from each side, line this up with the outside of your foundation side boards and attach to your braces. 57” support boards will be measured 10.5” from each end (to compensate for the side boards)...these will be 10.5” and 46.5”. Line these marks up with the outside of your foundation and attach to braces. Attach side and foot boards and you are likely close enough now that I don’t need to tell you to vacuum before you start showing us how you did it. You’ve spent this much time, please leave me a comment. Thanks so much for your time.
This is my first YouTube video that I’ve really put some time in to. I genuinely appreciate any comments you may have and any shares you may send.
*UPDATE*
I ended up just buying a black fitted queen size sheet and slipping it over the frame once I was done. This was definitely the best idea.
*KING SIZE*
I've made a WHOLE video for this one now. Please see the 'videos' section on my channel to find this awesome DIY video.
I have not personally built any of the following bed frames so these measurements are approximate.
*TWIN*
I really don’t know that I would try to build a floating bed frame for a bed with the dimensions of a twin due to the tipping risk, so I’ll say if anyone is going to do this, do it at your own risk, and please be careful. On my queen size, I had a 12” overhang on 3 sides to complete the floating look. Due to the dimensions of the twin mattress, I’m going to shorten this to 10” to hopefully provide more stability and keep it from tipping to one (long) side or the other (long side). Make sure that your mattress measures what appears to be the standard 39”x75”. Building it exactly as I did in my video, the cuts for the base will be 2@65” for the outside & 5@16” for the center supports. Your frame cuts will be 2@75” for the outside and 6@36” for the center supports.