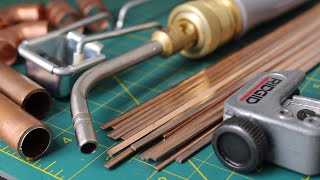
Nitrogen and Torch Use

Nathan Orr and Roman Baugh teach a segment of the Kalos pipefitting class, focusing on the importance of purging and flowing nitrogen during the brazing process. They also focus on torch use. This video is the second in a short series about pipefitting practices for commercial HVAC/R.
Purging and flowing nitrogen while brazing displace oxygen and keep it out of the copper tubing, preventing the formation of cupric oxide inside the tubing. However, if left uncapped or unsealed, the tubing may be contaminated before brazing, and we should do a visual inspection to check for foreign objects or contamination. To reduce the risk of contaminating the copper tubing with shavings, we should clean the copper before we cut it, use a proper tubing cutter, and be careful not to let the burr or shavings fall in after deburring. Failure to deburr or ream the copper can cause turbulent flow in the lines, leading to possible vibration leaks. Complacency during the tubing preparation process often leads to errors.
When it’s time to insert the tubing, the depth of the fitting should be equal to the tubing diameter. There should also be very little space between the tubing surfaces; wide gaps between surfaces lead to poor penetration due to insufficient capillary action.
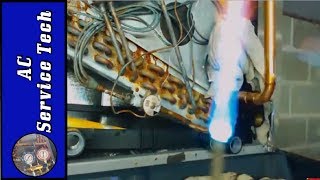
We purge systems with nitrogen to displace oxygen inside the tubing before brazing; purging requires a higher SCFH output than flowing. After purging, we flow the nitrogen at a much lower SCFH output to keep oxygen from going back into the tubing, and we keep flowing during the actual brazing process. Note that flowing nitrogen is NOT the same as pressurizing with nitrogen, and we’ll want to keep from sending nitrogen through live refrigerant circuits and components (like valves, compressors, etc.). If we don’t purge the system and flow nitrogen while brazing, we’ll get black scale buildup, which can be mistaken for burning the pipe at first glance; heating the joint doesn’t cause black scale (cupric oxide) buildup; brazing without flowing nitrogen does.
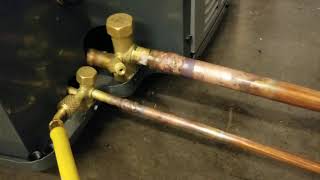
Brazing often happens near heatsensitive components, including valves. We must protect those with heatblocking putty and wet rags to avoid damaging them. When working with valves with sensitive seals or gaskets, we should ensure that those are in the midseated position before we start brazing.
The main two factors that will dictate torch selection are piping diameter and application (i.e., accessibility and clearances). Some torch tips are designed to help apply heat evenly in tight spaces, like the Cap’n Hook tip. Rosebud tips are ideal for applying heat over a relatively large area. Torch tips that are too small cannot adequately heat a joint and can lead to leaks in the future, and tips that are too big expend oxygen and acetylene too quickly.
When we set oxygen and acetylene pressures, we have to make sure the regulators are shut off and that you know which gauges are for your tanks and which ones are for your hoses. Bubble test the connections and hoses for leaks, and be sure to set the tank pressures at the regulator instead of the handle.
Flames come in three varieties: carburizing, neutral, and oxidizing. Carburizing flames have excess acetylene and have large secondary feathers; these can cause chemical reactions on the surface of the base metal, so we want to avoid using these flames. The neutral flame, which has an even mix of oxygen and acetylene, is the most desirable flame we can have. Oxidizing flames have too much oxygen, have a small cone, and lack a secondary feather; these flames can cause cupric oxide to build up inside the joint.
The ideal brazing technique is to start by brazing the joint closest to the nitrogen source. To begin heating the joint, start by applying the torch to the male end of the connection and then gradually apply heat to the whole joint. The torch doesn’t melt the alloy, as it doesn’t enable the alloy to draw deep into the joint; instead, the base metal should be hot enough to melt the alloy. When copper is hot enough to melt the alloy, it turns a cherry red color. While you’re heating the joint, move the torch slightly to keep the heat evenly distributed, but try not to move the torch too much; otherwise, the joint might not heat up properly.
Some common problems pop up when we’re dealing with joints that are too hot, joints that are too cold, or tubing gaps that are too wide. Proper tubing preparation and torch use will help you avoid these problems and their consequences, including leaks and pipe damage.
Buy your virtual tickets or learn more about the 4th Annual HVACR Training Symposium at https://hvacrschool.com/symposium.
Read all the tech tips, take the quizzes, and find our handy calculators at https://www.hvacrschool.com/.