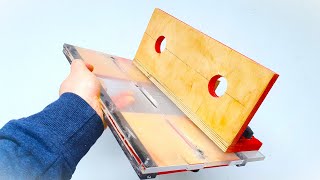
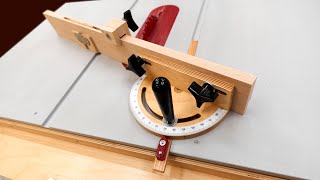
🟢 Making Precision Miter Gauge 👍 FREE PLANS Miter Gauge 👍 Don't Repeat My Mistakes

In this video i show you how i made my precision miter gauge with nonius for my homemade table saw.
All plans I ever made I collected in one place. Save this link for future I will add new plans to this collection and don't forget to subscribe to my channel to stay tuned.
https://drive.google.com/drive/folder...
Support GRINwood:
PayPal: [email protected]
Other tool making videos:
My homemade table saw free plans: • My Homemade Table Saw FREE Table ...
Homemade bar clamps: • Bar Clamps DIY Making six Long Du...
Homemade marking knife: • Marking Knife Build From an Old Fil...
Hope you will not repeat my mistakes and make your miter gauge more accurate.
Please like and subscribe! And happy woodworking!
First of all i want to say sorry for my english, i know it's fare from perfect, so please correct me if you see errors. Thank you
Transcript:
00:15 first of all i started sanding 1mm thick aluminum sheet with 150, 220 and 320 grit sandpaper
00:32 cleaning surface with acetone, i used a nail cleaning liquid, as for me it works good also
00:44 print flipped images on glossy photo paper (or other laser iron transfer paper, my was 150g/m) on laser printer with maximum toner settings. Also print it with 100% scale. Download images here:
http://grinwood.co/makingprecisionm...
01:20 started transfering images to the aluminum surface. For this purpose i used an iron in three dots mode (maximum). Few napkins helped to distribute precure evenly.
02:22 despite my best efforts, I have failed.
if you know why the image transfering partially, please leave your opinion in comments
02:38 my second try was not much better but good enough for me, themost important part transfered good
02:50 some dots that not transfered i protected from etching with nail lacquer
03:05 etching electrolyte i prepared with water (40g) and salt (about 1015g)
03:10 for this purpose i use a 12v 3,5A car battery charger. Positive terminal connect with etching detail and negative use as etching tool.
03:55 continue etching until you will fill the relief with nail
04:23 cleaning toner with nail liquid or acetone
05:53 my second fail, i forgot that metal is much harder than aluminum and it can leave a scratches, don't do like that
06:35 gluing aluminum sheets to the plywood with super glue
09:15 when i drilled this 10mm hole the drill bit muve a little left and subsequently the center moved to, but thanks God it was not
affected the accuracy.
09:47 with this reaming mill i made a precision holle for 8mm bushing that is just a little longer than this angular scale board.
10:22 drilling 8mm holes in nonius part for 6mm screws. That holes are bigger just to give nonius a space for calibrating
10:38 yes, i for got about clamping slot
15:58 yes, ttrack are much better for this purpose, but i didn't have that so here is my solution. One day i will rebuild it for sure :)
16:10 making bolts for ttrack from wide head furniture bolts.
18:00 i decided to glue up aluminum pipe in one of plywood pieces to fix it there securely.
18:25 assembling
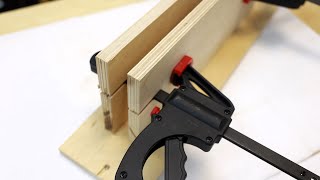
19:11 angle calibrating
19:28 whe the piece you cut is perfectly square, set up the nonius part in position 0 degrees
19:44 making a quick set up holes. I made them for 0, 10, 22.5, 30 and 45 degrees
Hope this information was helpful
Support GRINwood:
https://www.etsy.com/listing/774944100
GRINwood shop:
https://www.etsy.com/shop/GRINwood
Follow GRINwood:
/ grinwoodprojects
/ dakhnogregory
/ grinwooddesigns
/ grinwooddesigns
Music
Silent Partner Parasail • Silent Partner Parasail [Rock] Loop
Cloud Patterns Silent Partner • Cloud Patterns – Silent Partner (No C...
St. Francis by Josh Lippi & The Overtimers Video Link: • Josh Lippi & The Overtimers St. Fra... .
Would you like to use my videos in your media projects?
Please contact me: [email protected]


![mini precision crosscut sled jig for table saws [woodworking]](https://i.ytimg.com/vi/I2ZnOnJZ3vE/mqdefault.jpg)