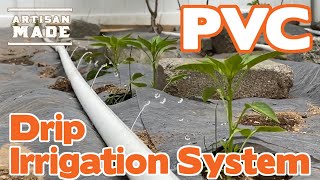
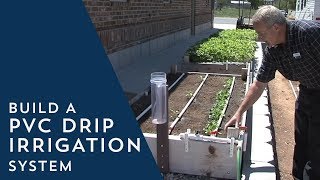
IMPROVED DIY Garden PVC Drip Irrigation

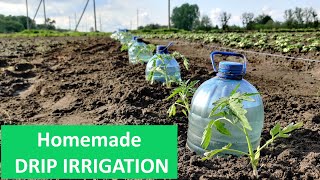
Here’s a great DIY way to get water right at your garden plant’s root zone. This minimizes the use of water because it’s only used right where it’s needed. This GREATLY suppresses the weeds as well.
#irrigation #gardeningtips #dripirrigation
This is our second iteration of this system. The first one was adequate, and we got good results. This new version is much improved, using larger supply and return manifolds, flow balancing valves, and most significantly, a return manifold that makes the setup a “closedloop.”
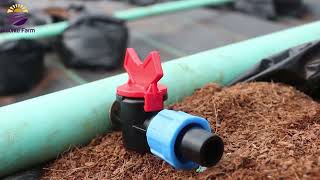
Build the setup using standard PVC pipe, fittings, valves, and a garden hose to pipe fitting. We use 1” (25mm) pipe and fittings for the supply and return manifold, and ¾” (19mm) pipe for the laterals that run along the plant rows.
We water a plot of about 200 corn plants in a space about 11’ x 30’ (3.4m x 9m) as well as raised beds that are about 4’ x 8’ (1.2m x 2.4m), We don’t think we’d use this approach for anything much bigger. There are better “off the shelf” products out there for that.
Our spacing for corn is 9” (about 230mm) in a row, with the rows about 30” to 32” (about 800mm) apart. This works well for shading, cultivation, pollination, and wind resistance.
This lowtech system simply uses a highquality commercial ⅝” (16mm) garden hose attached to one of our hose bibs that delivers about 60 PSI (pounds per square inch) and the hose outputs just under 16 gallons per minute (GPM) or about 950 gallons per hour (GPH). For those using the metric system that would be about 61 liters per minute or 3596 liters per hour.
Water volume needs to be sufficient with this “leaky” system. 1/16” holes (1.6mm) holes are drilled in a straight line along the lateral pipes at the pitch (distance apart) you need for the crops you are growing. If you mix crops and pitches of the holes, balance the water flow using the diversion valves.
You have three methods to adjust the system.
First, hose volume. Too little, and the system will “starve out” before getting water to all the plants. Too much, and you will have joints starting to work apart, as well as too strong of streams of water. You want the water to land within a very short distance from the pipe.
The second is flow balance valves installed in the manifolds. With two on each manifold, we’ve been able to finetune the system using only one of them, but if we were mixing crops, then they would be used more.
The third is by first raising sections that are getting too much water. You can do this with blocks of wood, bricks, or squarish rocks. However, with the return manifold, we’ve not had to resort to this, as the system tends to balance itself out well.
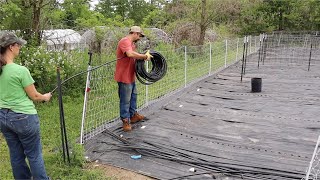
Begin by getting all your supplies and parts together, Mark straight lines down the sides of all the pipe parts to use as a reference when drilling and assembling. The printing on the pipes isn’t usually straight and you want water coming out of all the holes in the same plane. The same goes for assembling the tees and elbows on the manifolds.
To get straight lines, tape together 3 or 4 pipes about 4 places along the length. Make sure the batch isn’t twisted but is lying flat. Use a permanent marker to draw lines down the length where the pipes nest next to each other. Cut the tape and you’re ready to go.
Glue the manifolds together for easier storage, setup, and teardown, but the rest of the system simply pushes together.
Use a 1/16” (1.6 mm) drill bit to drill holes at the pitch (distance apart) you require, always drilling on your reference line.
When making the manifolds, you will have an extra fitting on the supply side because of the hose attachment. So, be sure to assemble the two manifolds side by side to get the tees and elbows to line up so you’ll have nice straight rows, and the system goes together easier.
Assemble the system, and flush out dirt and plastic bits by leaving the return manifold off. Then assemble, and balance the water flow. The wet spots on the plot will also tell you exactly where to plant! I plant a couple of inches to the side of the pipe.
To maintain the system, check joints from time to time, and use your drill bit to clean out clogged holes. Cover the manifolds to delay UV damage (we use mulch) and be sure to disassemble and store the parts out of the sun over the winter.
And, yes, you could add a hose timer to further automate the system!
We are aware that there are various opinions on whether or not to use PVC for safety and health reasons. We are fine with this approach, but that’s your decision.
There are readymade systems available, along with emitter tapes and the like. We’ve used them, and they work fine, but we like the rigidity of the pipe that helps in the layout of the system as well as bundling it up at season’s end to store until the fun begins all over again!
JUST DO IT YOURSELF!
Instagram: / dirtfarmerj
Facebook: / dirtfarmerjay