How We Built a Plastic-Free Chicken Waterer (That Requires Virtually No Maintenance)

How We Built a Heated Water System for Our Chickens (Without Plastic)
In this video, we’ll show you how to build a gravityfed and heated poultry watering system without using toxic components like plastic rain barrels and PVC pipes.
When we decided to add a flock of chickens to our homestead, we knew that we wanted to automate as many of the regular chores associated with keeping chickens as possible.
One of the most important aspects of keeping your chickens healthy is to provide them with fresh water and quality feed. However, chickens are messy, as we learned firsthand while we had them in the brooder. So we knew that we wanted a nipplebased water system that we wouldn’t have to refill and clean every few days.
Additionally, I’ve learned from the research I’ve done for my health and wellness blog that most plastics (including foodgrade plastic containers) leach estrogenlike chemicals into their contents. That’s especially true for liquids held at room temperature or higher, so we didn’t want a plastic rain barrel that sits in the sun all day to contaminate the water supply of our chickens.
As a result, we decided to build our own gravityfed watering system using an old oak wine barrel, a copper pipe and a charcoal filter.
[Chapter Markers]
0:00 Intro
0:31 About Our Coop’s Default Watering System
1:38 Why We Decided to Go PlasticFree
2:20 Our PlasticFree Watering System Setup
13:16 Closing Thoughts
Prerequisites: you need two power outlets inside or near the coop to connect the water recirculation pump and the deicer.
Materials needed for barrel:
59gallon natural wood rain barrel
3/4 in. MNPT brass multi turn hose bibb
Steel mesh screen
Materials needed for pipe:
Two 1/2inch FTG x wrot copper reducer
1/2 in. fitting x FNPT wrot copper adapter
2 in. x 10 ft. type M hard copper tube (cut to 48 inches)
3/4 in. fitting x MNPT wrot copper adapter
2 x 3/4 in. FTG x wrot copper reducer
Two 2inch copper slip couplings
Water heater circulation pump
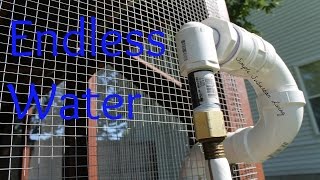
Chicken watering nipples
2 in. pipe straps
Other materials needed to connect the system:
Submergible bucket heater
Thermostatically controlled outlet
Sediment filter
Charcoal filter
Washing machine hoses with elbow
3/4 in. MHT brass coupling fitting
3/4 in. MHT x 1/2 in. MIP brass adapter fitting
Tools we used:
Milwaukee SHOCKWAVE 11/32 in. titanium twist drill bit
Drill America 1/8 in. 27 carbon steel NPT pipe tap
Power drill
Jigsaw or reciprocating saw
1 in. spade bit
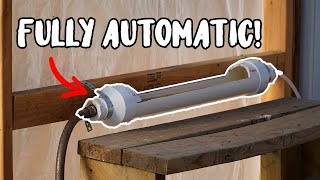
How to connect the system:
Install the barrel on a pedestal or base to raise it up above where you’ll install the copper pipe. Keep in mind that the system will work using gravity when the pump is not running, so the barrel needs to be higher up than the pipe.
Install the copper pipe inside your coop using pipe straps and screws.
Attach the pump to the right side of the pipe, making sure you pay attention to the flow direction arrow on the pump.
Connect the other end of the pump to the 1/2inch brass bushing fitting, and then to the hose that’s connected to the spigot on the barrel.
Connect the second hose to the left side of the pipe and plug in the pump directly to an outlet (bypassing the temperaturecontrolled outlet) to get all of the air out.
Once all the air is out, connect the pump to the temperaturecontrolled outlet and the end of the hose to the return connect on the side of the barrel.
Submerge the bucket heater and attach the mosquito mesh to the top of the barrel. You might have to cut out a piece of the mesh to make space for the cable.
Connect the bucket heater to a standard power outlet.
#ChickenWaterer #RaisingChickens #BackyardChickens


![Why We Broke Up Our Rabbit Colony [Lessons Learned and New Strategy]](https://i.ytimg.com/vi/hBRF12-dCGs/mqdefault.jpg)


![Joel Salatin Rabbit Tractor UPGRADE [How to Build It]](https://i.ytimg.com/vi/2p7opHq_5kw/mqdefault.jpg)