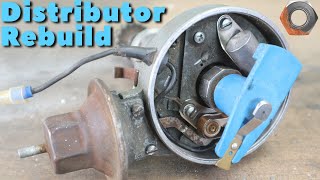
How to REBUILD a DISTRIBUTOR

Distributor rebuild kit: http://www.kbox.ca/catalog/product_in...
Don't want to rebuild it? Here's a brand new one: https://amzn.to/2prglUY
Please double check fitment with your 4AGE powered car first :)
Got rid of the distributor in your 4age engine? Seal up the hole with the D4A distributor delete: https://www.driving4answers.com/produ...
To rebuild a distributor we are going to need a distributor, obviously, a distributor rebuild kit and some tools.
The first thing we are going to do is to remove the little gear at the end of the distributor shaft. It's held in by a pin which is flared at its ends.
The easiest way to remove the pin is to place the distributor in a vice, punch a little pilot hole and then basically drill away the flared part of the pin.
After this you can punch out the pin. The pin has been in there for a long time so it might need some persuasion to be punched out. Heating it up a bit and spraying penetrant helped in my case
Before you remove the gear make sure to make some marks so you know which you to reinstall it. The gear is easily removed with a gear puller.
Once the gear is removed, remove the distributor cap, heat shield, if you have one, and the rotor. You will then have access to the two tabs which hold down the distributor shaft. The tabs are held in place with Philips head screws. Unscrew the bolts and retrieve the tabs by using some needle nose pliers. Once the tabs have been removed you can get the shaft out.
Once the shaft is out you can replace the old inner seal with a new one from your rebuild kit.
Remove the old seal using needle nose pliers and clean up the area where the seal sits. Oil up the new seal and install it using a socket that is just slightly smaller than the seal.
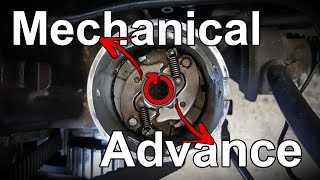
After this you can replace the bearing on the distributor shaft. The first thing you need to do is measure the exact distance between the bearing and the trigger. Write down the measurement. This will ensure the new bearing is reinstalled in the exact same position as the old one. Before removing the bearing I like to sand the shaft with some very fine grit sandpaper.
To remove the bearing, place the shaft in a vice and remove the bearing using a gear puller. You can also use the opportunity to remove the rust from the trigger and the rest of the shaft.
You can reinstall the new bearing by using the gear puller once again. Its also a good idea to use a washer to protect the new bearing when installing it. Once installed don't forget to confirm that the new bearing is in the same position as the old one.
After this you can reinstall the shaft into the distributor hole. Lube up your shaft and simply slide it into the hole.
Next up reinstall the gear by using a new pin from the kit. The pin in the kit in the link above does not need to be flared and simply needs to be hammered in. The hammering action mushrooms the top and makes it secure.
After this all that's left to do is to replace the other two orings on the distributor and reinstall the rotor, cap and heat shield.
Thanks for watching
Intro song: Kiss by Escape
#d4a #distributor #rebuild #diy #howto #4age #4age16v #aw11 #ae86 #4agebigport #mr2mk1 #mr2 #toyota #jdm #celica #corolla #starlet #ke70 #fx16 #fix #repair
D4A (driving 4 answers) is part of the amazon associates program