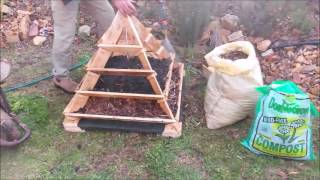
HOTTEST Selling Planter of 2024

FREE PLANS! (please support my content by liking the video before downloading)
https://freeimage.host/i/J1VXC5g
SALES PITCH
You can grow an entire garden in a very small space! The unique stacking design allows you to grow approximately 8 times more plants per square foot than a conventional garden. The Plant Pyramid is a versatile planter that can be used for vegetables, herbs or flowers or any combination of the three. The stacked beds allow root systems to take advantage of a large soil volume and promote more vigorous plant growth. By raising the garden beds off the ground, they are easy to reach for planting, tending and harvesting and at a height that’s pleasing to the eye and sure to catch the attention of your neighbors and friends.
First step to building our planter pyramids is to cut that 65degree angle for that 2x4 structure. I am going to use my circular saw since I cannot achieve those angles on the miter saw without building a jig. And, since these pieces are quite hefty, I care to manage and try to get all that with the miter saw with the board sticking out at a weird angle.
All you are going to do is set that pivot to be four or five inches down from the top of your board. This is because the circular saws base is an inch and a half from its actual blade. So, by only measuring down an inch and a half, you get one of these little numbers where it doesn’t give me a perfect peak. So, I’m going to go down two or three inches, and solves that problem completely.
Rotating on that pivot point, set the bottom degree to sixtyfive. If you guys are unfamiliar with speed squares, just know that the pivot and your degree marking sill be on the same side of the board. So, once you guys have that lined out, all you will do is draw your line. And then you guys can cut the line however you feel comfortable. I actually just use my speed square and clamp it down onto my workpiece and use that as a temporary fence for my circular saw.
Measure down three feet from the top peak and make a mark. 90 minus 65 is 25. So 25 degrees will be our bottom cut, and I just do this at the miter saw. And now we have made one of our uprights, so we just need three more.
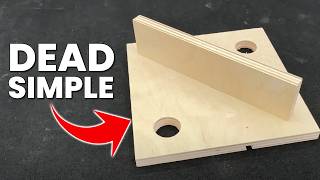
To make our pyramids look, better than that, we need to rip a squared piece for the center for all of those 2x4's to rest up against. So on the table saw were just going to take one of those scrap pieces of wood and rip a 11/2 by 11/2 inch square.
Our inside angle measurement comes out to 81/4. So, at the miter saw cut down that square piece we had just ripped on the table saw.
Since I have a 21/2 inch screw, if i pilot my hole about 31/2 inches down, I get a good amount of meat into this center board. So, that is what I am going to do first. Now we are just going to screw everything together. I am using a titebond three, it is the only exterior waterproof glue they make. Titebond two or original is not ready for outdoor use.
Then just line your piece up for the top corners. Make sure your thumb is close enough so that when you are driving this screw in, it can skip off and ram into your thumb. Its the best part of my day.
Mmhmm mmhmm, were going to the ground!
And there’s our pyramid, minus the bottom
To achieve this cross over base, i first measure my pyramid to figure out the two lengths that will be needed. Both of mine come out to 32 inches on the dot. Cut two pieces of 2x4 to that measurement. I did go ahead and dogear the corners just to make them more ascetic on the bottom so they weren’t so blocky.
In order to lay the two pieces like this so that they are flush together we need to be removing some material from this piece and material from this piece. So half of the top, half of the bottom. That is a halflap joint. So, to do that I first found the center of my board which was 16 inches. And then I measured over 13/4's on both sides. I did that because my board was 31/2" that divided by two: 13/4. So then with our two pieces lined up, you just make those marks on your board. And then head over to the miter saw.
Your miter saw has a depth control. And if you throttle that down, it won’t allow your blade to go all the way through your piece. So we need to line it up to go half through our 2x4, and to do that I generally take it down a little bit, make a pass and tweak it as I go to get that perfect cut.