etrailer | Yakima JetStream Crossbars Installation - 2022 GMC Sierra 1500

Click for more info and reviews of this Yakima Roof Rack:
https://www.etrailer.com/RoofRack/Ya...
https://www.etrailer.com
Don’t forget to subscribe!
/ etrailertv
Full transcript: https://www.etrailer.com/tvinstally...
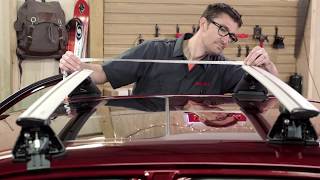
How's it going, everyone It's Ethan here with etrailer. Today we're going to be taking a look at the Yakima Roof Rack System with our JetStream crossbars and showing you how to install them on our 2022 GMC Sierra. If you're transporting a large amount of items or just large items in general and you don't have room in your bed, or they're just items you'd rather keep out of the cabin of your vehicle, a roof rack system like this is gonna be a good way to do that. The crossbars that we have here are an aerodynamic shape so they taper in the back just to cut down on some of that wind noise and wind resistance. With any sort of roof rack system, you'll get a little bit, but this is nice that it cuts some of that down. Additionally, it does feature this rubberized strip inside this Ttrack slot, so you can use these roof rack with Ttrack accessories and there's no need to trim the actual strip to get those on.
As far as the length of our crossbars go, there are a couple of different options as far as length. These are 60", which we found gives us enough room on top and enough overhang. The overhang that we have, we're measuring at 5", which gives you a little bit more room for accessories without being overbearing or sticking over your vehicle too much. With a weight capacity of 165 pounds, these crossbars will do a fine job of storing most of the bigger items that you might need, but something to keep in mind when you are storing those items is are they going to make contact with the top of your roof So we'll just measure from the roof to the bottom of our crossbars. It's about 3 1/2", so if your accessories do have clamps or things that hang onto the crossbars, you wanna keep that measurement in mind.
Additionally, to see how much height we're adding to the top of our vehicle is about 4 1/4", so if you live with these crossfires on your vehicle, that's how much you're gonna be adding to it. Additionally, if you have taller bindings on your skis or things like that, that's a good measurement to keep in mind to see if those will make contact with your vehicle as well. To start the install process, we like to just lay everything out, making sure that we know what everything is and that we have it. So we're going to obviously have our crossbar here, two towers, the covers for the towers, two hooks that'll keep the actual feet in place, two pads for the bottom, and our end caps. Additionally, there is a provided tool and we recommend going ahead and grabbing a fabric tape measure.
They do provide one, but we have our own. We'll start by assembling our towers. First thing, we probably want to loosen this metal plate here. We do that first actually by releasing this security lever. As you can see, it covers it.
If you pull it back, you have access to get in there. So we'll loosen that. And in our case, there are three different steps for the GMC Sierra that we're going to be putting these on. They do recommend setting it to C, but make sure you check the manual and see what's recommended for your vehicle. Now the next step is to get the actual feet on the towers. So ours came with a plastic cover. We just removed that, and making sure that this arrow on the tower is facing out, it just snaps into place. (feet snapping onto tower) And now we can go ahead and slide this onto our crossbar. Because we loosened that metal plate earlier, it should just slide right onto our track like so. Make sure you consult the manual to see the specific measurements for your vehicle, but as you can see, there are little ruler notches on the actual crossbars themselves, so using those will slide the feet to the point where we need it, which is right about here, in our case, and we can get that tightened down. (screwdriver twisting) Once we have our feet on, we can put our end caps back on just like that. As you can see, we already have our first crossbar installed. We got our measurement from the end of our glass windshield here and took it up to the front of the tower. It's going to be vehicle specific, but we have it where we need it in our case. Now we can fit our crossbar onto the roof of our vehicle, trying to do it as carefully as possible. The pads on the bottom should make it a little bit nicer on top of your vehicle, but we'll get it vaguely where we need to be and adjust it. When you actually place the crossbars on top of the vehicle, these feet are nice 'cause they will actually fit in the ridges on top of your roof. Now that we have our crossbars roughly where we need them to be, we'll take a measurement to make sure that the crossbar spread is wha