etrailer | Trailer Hitch Installation - 2008 Acura MDX - Draw-Tite

Click for more info and reviews of this DrawTite Trailer Hitch:
https://www.etrailer.com/TrailerHitc...
https://www.etrailer.com
Don’t forget to subscribe!
/ etrailertv
Full transcript: https://www.etrailer.com/tvinstalld...
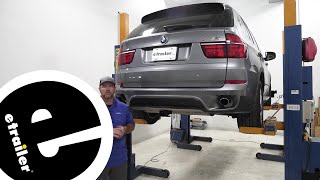
Today in our 2008 Acura MDX we'll be installing the draw tight class three max range trailer hitch receiver. Part number 75614. Here's what our hitch looks like installed. As you can see it's tucked up nicely behind our bumper cover and the part that hangs down is the class three, twoinch receiver here and a little bit of the frame of the hitch. You may notice right here, there's this tab sticking out with a couple holes. This is for mounting a bracket to secure your wiring for your trailer harness such as a four pull flat or seven pull round. We also have these nice, easy to use safety chain loops right here. A plate welded on the bottom of the receiver. Really easy to use even for small diameters safety chains they should clip in there nice and easily.
There's two pin holes here on the side, the back one right here is the standard 5/8th inch diameter hitch pin hole to secure your ball mount, bike rack, or cargo carrier. To the rear of that we have a half inch diameter hole for a j pin stabilization device. What a j pin stabilization device is if your device doesn't already have an antirattle device built into the shank of it where it goes in the receiver such as your bike rack or cargo carrier. The j pin will take up some of that rattle and you won't have to listen to the shake going down the road inside your receiver causing noise. This hitch has a 400 pound max tongue weight rating and a 4,000 pound max gross trailer rate rating. If we we're to step up to weight distribution that max tongue weight tows increase to 500 pounds and the max gross trailer rate rating also increases to 5,000 pounds.
Now you'll obviously want to consult with the owner manual of your Acura MDX. This hitch features a nice gloss powder coat finish. It will resist rusting for many years down the road. Now for a few measurements to help you choose any hitch mounted accessories you may need such as a ball mount, bike rack or cargo carrier. You're looking at about six inches from the center of the 5/8th diameter hitch pin hole to the rear most point on our back bumper and about sixteen inches from the ground to the top of the two inch receiver opening. Now that we've gone over some of the features, of our draw type class 3 hitch we will show you how to install it on our Acura MDX. Here's what our hitch comes with.
With the hitch here itself and the hardware necessary to install it. We have eight bolts here and eight washers. This hitch goes on to factory well nuts already in the frame there's no drilling required, fairly easy installation. With our rear hatch opened here, we'll take out this factory accessory cargo mat here and set it aside. Open this up here. We'll gain access to our spare tire tools.
Well get our spare tire tools out. Right here, we'll pop this open so we can lower the spare tire. Now your spare tire iron that comes with the vehicle, there's a little notch here inside and fits down over the stud to lower the spare tire. Lift up on our spare tire here and we'll move the cable from it and set the tire aside. Now we need to lower our exhaust down to have access for our hitch to go up. Spray the hangers with the lubricant here so they slide off nice and easy. There's one on the inside edge of the muffler and one towards the rear of the muffler on the outer edge. Now this vehicle has dual exhausts so we'll need to do the same on the other side. Now we'll take a pry bar here and work our hangers off. Do the same on the other side. Now we need to remove our heat shields. There's three, ten millimeter bolts on either side. Do the same on the other side and here are our four factory holes. That our hitch should be installed on, on either side. It's a good idea to spray some lubricant in there to wash any dirt, debris, or rust that may be in there. Do the same on the other side. Now we'll install our washers on all of our bolts. So we'll raise our hitch up over our exhaust, like so. We'll install our hardware. See this gap between the hitch and the frame of the car, once we start to tighten the bolts down it will draw the hitch into the frame and everything will be secure. Now we'll use a 22 millimeter socket and we'll tighten our bolts up. Now for these bolts here towards the rear of the hitch, you'll use an extension you can get to them a lot easier. They're all spinning nice and easy so now we can push for impact. Now it's a good idea to alternate the bolts just so it draws the hitch in evenly so we'll switch to the other side. Now that all of our hardware is tightened down we'll torque it to the manufacturers specifications found in the instructions. Now our hitch is torqued down to t