etrailer | Tow Ready Trailer Wiring Harness Installation - 2014 Toyota RAV4

Click for more info and reviews of this Tekonsha Custom Fit Vehicle Wiring:
https://www.etrailer.com/CustomFitV...
https://www.etrailer.com
Don’t forget to subscribe!
/ etrailertv
Full transcript: https://www.etrailer.com/tvinstallt...
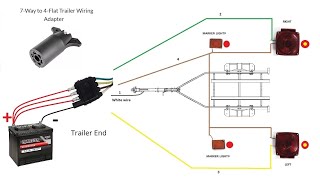
Today in our 2014 Toyota RAV4 we'll be installing Tekonsha T1 vehicle wiring harness with a fourpole flat trailer connector. Part number 118578. So here's what our old wiring looks like now that it's been installed. As you can see, it's completely hidden inside our vehicle. To gain access to it, just lift up on your spare tire cover, pull it out from down below, close the cover back up on. I'll set it to the side of our latch here for our hatch and then close the hatch on up. Now we're at a good height with length of wire to hook up to our trailer.
We just take out protective dust cover off here, make our electrical connection to our trailer and if we're all coupled up with our safety chains hooked up we're ready to get down on the road. Now when we arrive at our destination and we're ready to unhook from our trailer, we just unhook everything, put our dust cover back on to help protect the connector, open our hatch back up, lift up on the cover, tuck it down inside a storage compartment, then close our hatch and we're ready to go on our way. Don't have to worry about a wiring snag on anything, we're loading cargo in and out of our vehicle, it keeps it nice and protected and out of the elements. Now the reason you want this wiring harness is if you're going to tow a trailer with your RAV4, you need to have operating turn signals, taillights and brake lights on your trailer in order to legally tow it. This will help provide that solution for you, allowing you to safely and legally tow your trailer going down the road. This wiring harness will provide you with 4.2 amps of power for your turn signals and your brake lights and seven and a half amps of power for your taillights and all the running lights on your trailer. It's a quick and easy solution in order to give you the electrical connector that you need to tow your trailer. We'll start with opening our rear hatch, we'll remove our floor covering here, just slide it forward will be fine.
Take out our spare tire. Now on our driver's side of our vehicle we have a storage tray next to our spare tire, it's held in place with three clips. There's a trim panel pull to get them out, or a Flathead screwdriver. Okay, with those three removed, we can grab our panel, lift up on it, and we'll set it aside. Now we have two 10 millimeter screws that we need to remove. One here below our light, and one up here below the white panel.
Now we have a Phillip's screw right here. Now our cargo hook right here, we'll pull down the hook, pop open the cover, we'll find a 14 millimeter bolt, we'll remove that. We have one more 10 millimeter bolt here behind another cargo hook. Now we'll remove our center trim panel piece here. Many use a trim panel piece underneath it to help get it started. Set that aside.
Okay, now we'll remove our driver's side panel here. Pull back this weather stripping a bit, get our hands behind it, pull back. Those are those two bolts that we're still in there. Now pull back our white panel a bit as well. So right here we'll find our connector for our driver's side taillight assembly. Take our trim panel tool and we'll pop it off. We'll push on this tab here and disconnect it, separate those two. All right we'll leave those disconnected and repeat the same process for the passenger side panel is in order to get access to our connector. Okay, with our passenger side disconnected, we can now start making our connections. All right, now we'll take our connector that goes to our taillight on our driver's side and our connector with the yellow wire. We'll plug the female end into the male end on both ends and we'll put this back up in place. Okay we've got the clip pushed back in its original position. Now we'll take our module here and our doublesided tape, peel off one end, place it onto our module, press down firmly, peel of the other end, and we'll place it to a flat surface inside our vehicle. Right there will be a good spot. Now our white wire is a ground wire. We can attach it right here to this existing bolt on this bracket. We'll remove this bolt with a 10 millimeter socket. Place the bolt through our ground wire and reattach it. Okay, that will give us a nice, solid ground connection. This black wire here is our power wire for our module. We'll strip off a little bit more insulation, and we'll attach a yellow butt connector to it. Now we'll take an end of the black wire that comes with our kit, strip off some insulation, insert it into the other end of the butt connector and we'll crimp it down. Now we'll wrap our connection up with some electrical tape just to help keep any debris or moisture out


![[Installation] 20142018 TOYOTA RAV4 Smartphone Mirroring System](https://i.ytimg.com/vi/1Zv2bND1gk4/mqdefault.jpg)