etrailer | Dexter Electric Trailer Brake Kit Installation

Click for more info and reviews of this Dexter Trailer Brakes:
https://www.etrailer.com/Accessories...
Check out some similar Trailer Brakes options:
https://www.etrailer.com/deptpgAcce...
Click for more info and reviews of this Dexter Trailer Brakes:
https://www.etrailer.com/TrailerBrak...
Check out some similar Trailer Brakes options:
https://www.etrailer.com/deptpgTrai...
Click for more info and reviews of this Dexter Trailer Brakes:
https://www.etrailer.com/Accessories...
Check out some similar Trailer Brakes options:
https://www.etrailer.com/deptpgAcce...
https://www.etrailer.com
Don’t forget to subscribe!
/ etrailertv
Full transcript: https://www.etrailer.com/tvinstalld...
Speaker 1: Today we'll be taking a look at, and showing you how to install, the 10 inch Dexter Electric Trailer Brakes. They're available for the driver's side and the passenger side, or as a kit with both. They come in weight ratings of 3,000 pounds, 3,500 pounds, or 4,400 pounds. That's going to depend on which axle you have on your trailer.One of our customers, Paul, wrote in, "What is the difference between the 3,500 and 4,400 assembly and how do I know which axle I have on my trailer" Well that's easy, Paul. There should be a tag or information stamped into the axle. You just want to see what you have there, and refer to our site to get the appropriate one.
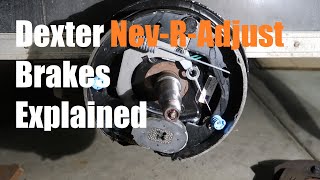
The 3,500 and the 4,400 are the weight ratings.This electric brake assembly is going to be a direct replacement for ones that may be existing on your trailer, or you can upgrade your trailer to add these. The manual inaudible 00:00:47 at the bottom will get a signal from the brake controller on your vehicle. Depending on the sensitivity of the brake controller, that will vary the magnitude of the magnetism on the magnet. The magnet will grab your drum brake, forcing the pads outward, causing the brakes to apply.The brake pads on our assembly are going to be bonded pads. What's nice about this versus riveted pads, is that as your brake pads wear, no rivets can poke through causing any damage to your drum assembly.
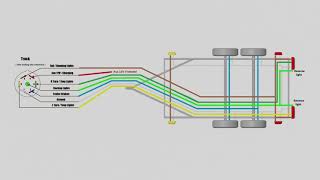
There is a left and right brake assembly. There's a sticker located on here that will tell you whether it's a left or right hand side. Another way you can help identify if you have the appropriate side is that this is a leading trailing pad set up, so the smaller pad is your leading pad, which goes towards the front, and the trailing is the larger pad, which is located towards the rear.It comes ready to wire, so you just need to hook it up to your old assembly's wiring if you've replaced it. Or if you're running new ones, you'll need to make sure you have one connection to ground and the other one connected to your brake controller signal. It doesn't matter which one's connected to which, either one will work.It'll connect to your axle with a four bolt pattern.
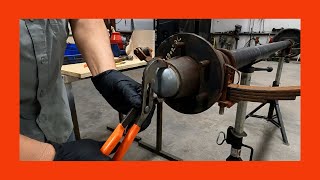
The hardware you'll need to connect it to your axles comes included with our assembly. When your tire's on, and the system's fully assembled, you can adjust it through the open slot, here at the back. The kit includes a small cover that can be placed over this, to seal up your assembly, once you're done adjusting.We're going to start with our wheel off. Since we're upgrading, by adding brakes to our system instead of just replacing an old assembly, we'll need to replace this hub with our new drum brake hub. You'll need to take the cap off here, at the end.
You'll just hammer this off. Below here, you're going to have your nut. To remove the nut, you're going to need to take the cotter pin, it's found beneath. We're going to have to straighten it back out, so we'll just grab it here, with our needlenosed pliers. If you are planning on reusing that cap we knocked off, I do recommend using a rubber mallet for that, so you don't damage it. Once you've got the cotter pin straight, you can just pull the cotter pin out. We're going to set it aside. We've got a napkin laid down for everything, so that way, we don't make a mess.Now, we'll remove the nut, located here in the center, using a pair of channel locks. I'm just going to unthread that, all the way. And we're going to set it aside.Our whole hub assembly can now be pulled off. You want to note, though, that there's going to be a washer and a bearing that's just going to fall out, so we're going to use our needlenose pliers to catch those. We'll set those aside, and now we can set our hub aside. Now, since we're adding drum brakes, we won't be reinstalling that hub, nor any of the components except for the nut and the cotter pin and the washer. We won't be reusing the bearings.Now you're going to want to remove all that grease that's on there. And we can now install our