etrailer | Curt T-Connector Vehicle Wiring Harness Installation - 2024 Hyundai Palisade

Click for more info and reviews of this CURT Custom Fit Vehicle Wiring:
https://www.etrailer.com/CustomFitV...
https://www.etrailer.com
Don’t forget to subscribe!
/ etrailertv
Full transcript: https://www.etrailer.com/tvinstallc...
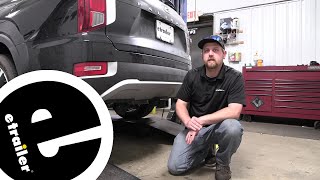
Hello neighbors, it's Brad here at etrailer and today we're taking a look and installing the CURT fourpole trailer wiring harness on a 2024 Hyundai Palisade. If you have a hitch on your vehicle, it's always worth maybe adding that fourpole trailer wiring harness. So if you're ever in a situation where you do have to hook up to a trailer or tow something, maybe just once or twice, you're gonna have the light functions that will translate to the taillights on the trailer keeping you safe and legal when you use your running lights, your turn signals and brake lights. This kit in particular is specifically for the Palisade and that makes it super easy. So it tees into your factory wiring of your taillights by using a OEM style plug. So it just kind of jumpers in between the two.
Makes it nice and easy, so you are gonna be plugging those into the taillights, but not to worry, this is module protected. So even if you have any faulty wiring in your trailer, it's not gonna back feed and cause any issue on your vehicle. It also has a 12 volt power wire that runs to the front to get 12 volt signal with an inline fuse. So that's also protected there from any surge that may cause from your battery. Now speaking of the install, it's pretty easy to do.
I would say the hardest part is just fish wiring wires to where they need to go and running it underneath the vehicle, but there's very minimal amounts of connections that need to be made. I'm gonna walk you through all the steps to make sure you get your trailer wiring installed. Now before beginning our installation, let's take a look at our wiring harness and see where it all goes. So we have our white, brown, yellow, and red wire. This is gonna go to our driver's side or our left turn signal.
So these are gonna plug in directly to our taillights. There's also this ground wire that we're going to attach as well. And as we follow this back, we've noticed that we have a green wire with very similar plugs and it's pretty long and that's because this is gonna run over to our right turn signal on our passenger side and that will run kind of along where the hitch is underneath. Now we also have obviously our fourpole connection, which will get mounted up kind of on the hitch as well or close to it. And then our black wire is stripped back here.
This is our power wire and we're gonna need to run the extra spool of wire that we have in our kit up to the battery to get 12 volt power. So let's start off by getting our taillights removed. To remove your taillights, it's very easy. You'll see with your hatch open these plastic covers. There's a small slot at the top of 'em, just use a small flathead screwdriver to pry those open. And that's gonna give us access to our two 10 millimeter screws so we can go ahead and get those removed. And then our taillight generally has alignment tabs that these kind of pop into. So if you kind of just pull straight back on this, that should pop it out. You can see this is where it slides in. You also have these two. So if it is fighting you, you can use a plastic trim tool. Just make sure you're not scratching your paint to pry along here. But this one came off fairly easily. This is gonna give us access to the plug on the back of our taillight. So push that tab down and get this separated and we'll set our taillight in the back just to stay safe. We'll go ahead while we're here with those tools and get our other side popped out as well. Underneath on the driver's side we have this plastic panel. We're gonna get this taken out and it's got a series of plastic push pins as well as some 14 millimeter plastic nuts. And on plastic push pins, there's gonna be slots here that you can use a trim panel tool like I have here, or even a flathead screwdriver to get these removed. Now this will go up eventually once we have our hitch installed so you can set this aside. You might wanna have a nice organized spot for your hardware. So the three plastic push pins and then those 14 millimeter plastic nuts, they come off pretty easy. Sometimes you can do 'em by hand, but you do wanna put pull down a little bit to kind of keep that tension drawing back. Otherwise it'll just kind of keep spinning on that stud. Now with our panel out of the way, that's gonna allow us to pull up our wires to make our connection here. So there's a gap in between your fascia and the body of the vehicle that you can put something down to be able to take those wires and pull it up. So I use an airline tube, you can use a string with a nut attached to it or really anything that you're able to