etrailer.com Trailer Hitch Installation - 2019 Acura MDX

Click for more info and reviews of this etrailer Trailer Hitch:
https://www.etrailer.com/TrailerHitc...
https://www.etrailer.com
Don’t forget to subscribe!
/ etrailertv
Full transcript: https://www.etrailer.com/tvinstallt...
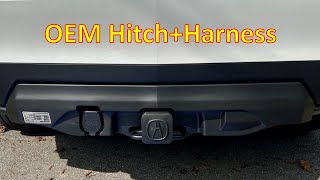
Today on our 2019 Acura MDX, we're going to be taking a look at and showing you how to install the etrailer class III custom fit trailer hitch receiver. Here's what our hitch is going to look like once we have it installed on our Acura. What I really like about it is the cross tube's going to be completely hidden behind the bumper, and all we're going to see is the receiver tube sticking out, so it's not going to distract from the looks of our MDX. It's a class III hitch, which means it's going to give us that two inch by two inch receiver tube opening and have a lot of different options when it comes to accessories that we can mount up.Now, the way you're going to mount any of your accessories to your hitch is going to be through the hitch pin hole here on the side. It is going to accept a standard five eighths pin and clip. Now, these are not included in the kit, but you can pick them up here at etrailer.com, along with some locking devices to keep your accessories secure.
And if you do plan on doing some towing, our safety chain connection points are going to be a loop style, welded to the bottom of the receiver tube, and you can see that we have plenty of room to get most size hooks on or off. And the slight offset of the hitch pin hole means that there's going to be less chance of interference between the hitch pin and our safety hooks.As far as the weight capacity goes for our hitch, it's going to have a 900 pound tongue weight, which is the maximum downward force at the receiver tube, along with a 6,000 pound gross trailer weight rating. That's the amount it can pull, including the trailer and everything we have loaded on it. Now, it is designed to work with weight distribution systems as well. That's going to be a separate component that's mounted on your trailer.
That's going to keep the tongue weight the same, but it's going to bump the gross trailer weight up to 8,000 pounds. Now, with all of those numbers in mind, you should always double check your Acura's owner's manual, because you never want to exceed the manufacturer's recommended weight.Like to give you a few measurements. That's going to help you whenever you're looking for accessories for your new hitch, like a ball mount, a bike rack, or even a cargo carrier. From the center of the hitch pin hole to the outermost edge of the bumper, it's around about three inches. That measurement's going to come in handy when you're looking at folding accessories to make sure you got enough room and that they're not going to come in contact with the rear bumper.
From the ground to the inside top edge of the receiver tube opening, it's right about 15 inches. That measurement's going to help you when you're looking for a ball mount to find the appropriate rise or drop to match up to your trailer.Now that we've seen what our hitch looks like and we've gone over some of the features, let's show you how to get it installed. To begin our installation, we went ahead and lowered our spare tire down. Then we're going to come to the frame rail on each side. On the bottom of the frame rail, we can see that we're going to have several holes.
Three of those are going to be threaded. Those are going to be our mounting locations for our hitch. Want to make sure that they're all clean, there's no dirt, debris, or rust inside those weld nuts. So to help me clean them out, I'm going to spray a little bit of spray lubricant inside. I'm going to come back with a nylon brush, I'm going to clean out the weld nut, make sure we won't have any cross threading problems when we put our hitch up. Want to make sure you clean out all three weld nuts on both sides of the frame.Now, the combination of hardware we're going to use is we're going to take one of our M14 bolts and a conical tooth washer. It's going to have teeth on there. You want to make sure those are facing up towards the hitch. We'll go through our hitch and thread our M14 bolt into the weld nut in each one of the spots. Now with an extra set of hands, we're going to lift our hitch up to where the holes in the bottom of the hitch line up with the frame. Once they're lined up, we'll take one of our bolts and the conical tooth washer. You want to make sure that you get it in there at least hand tight, so the hitch will support itself, then we can work on getting the rest of the hardware in place.Going to come back with a 22 millimeter socket and snug up all my hardware. Now I'm going to come back with a torque wrench, I'm going to torque all my hardware down to the specified amount in the instructions. You want to make sure you repeat that for all your remaining hardware. All we have left to do