etrailer | Aries AeroTread Running Boards Installation - 2022 Buick Enclave

Click for more info and reviews of this Aries Automotive Nerf Bars Running Boards:
https://www.etrailer.com/NerfBars...
https://www.etrailer.com
Don’t forget to subscribe!
/ etrailertv
Full transcript: https://www.etrailer.com/tvinstalla...
Hey, everybody. Ryan here at etrailer. Today on our 2022 Buick Enclave, we're gonna be showing you how to install the ARIES running boards. But before we get into that, why don't we just check these out and make sure they're gonna work for you. Running boards are one of those items that are pretty straightforward, and some people kinda get 'em for the appearance upgrade, they think they look nice, and then they also help you get in and out of the vehicle. So it's really beneficial for maybe children, help them get in and out, maybe people with limited mobility, makes it a little bit easier on 'em.
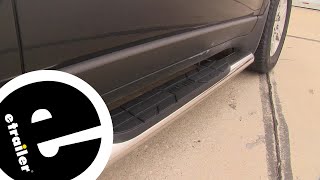
And these are kind of in the arena more so of appearance, at least in my opinion. I think they look pretty decent. They are kind of a matte black finish, and there's also a polished or chrome type set available as well, so you have a couple to pick from there. But don't get me wrong, they're still gonna have some functionality. If you open up the door, there's definitely something there to get your foot on, right I mean, I've got on big work boots and I can get easily my toes on there, so there is some benefit there, and it will make it a little bit easier to get in and out of your Buick.
Something a lot of people don't think about is different ways you can use your running boards. So, for example, my own vehicle, I like to use 'em in the winter time, where my boots are covered in snow and whatnot. Instead of just hopping up inside the vehicle and dragging it into the carpets, you can click your feet on 'em and knock all that off. And these are gonna be durable enough to handle that, and you're not gonna have to worry about damaging 'em or anything along those lines. And if you go to wash your car off or something, or if you by chance have a roofmounted accessory that you put up here, it is gonna give you a little bit of a better platform to kind of stand on and get the job done up on the roof and make it a little easier.
The surface area of the running board in terms of where you can actually step is gonna be about five inches wide, so you have a little bit of working room there. These are gonna have a weight capacity of 500 pounds, so that should be more than adequate. And these are gonna be made from aluminum, too, so you don't have to worry about rust issues down the road or anything along those lines. But other than that, at the end of the day, a nice touch on the Buick. They look decent and actually function as well, so you can't really ask for too much more.
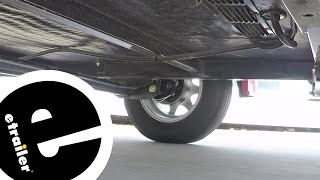
And as far as the installation goes, really not too bad. Everything's pretty easy to get to, and no huge modifications required or anything along those lines, so this is something you should be able to do. But speaking of that, if you'd like to see how that's done, feel free to follow along. We'll go ahead and install 'em together now. So we're gonna begin our installation. We're gonna be here on the side of our vehicle, and the first thing that I like to do is just kinda lay out all my brackets and hardware roughly in the position of where they're gonna go, since the brackets are specific to a certain position on the vehicle. That way it just kind of speeds things up when we're actually going to get these put in place. But with that said, we'll start with the front bracket, and we're gonna be working right here in this area. Our front bracket is going to sit like that underneath of our vehicle, and so there's gonna be two attachment points. This one, there will be a rubber plug there, and so just take a screwdriver and pop that out. And what you're gonna do is take one of these bolts, put that in there, and then take a plastic retainer and that'll kind of just slide onto the bolt, and you can kind of tighten it down, and that'll prevent it from falling inside the frame. As far as this attachment point goes, we're not gonna have a plug to pull out, so you don't have to worry about that. But we'll just take that same piece of hardware, and this retainer, and put that in as well. And once we have those in, we can then grab our bracket and get it put into place. Pretty straightforward here. Our bracket's gonna slide onto that bolt, and onto this one, and then on each one of those bolts, we're gonna take a flat washer, a split lock washer, and a hex nut, and we're gonna get 'em both started hand tight. For the middle attachment point, we're gonna be using this hole here. So just like the front, pull it out, and the same type of hardware there, and one of those plastic retainers. Then the middle bracket will look like this. It'll slide right over it, and we're goin


![How To Install TAC Running Boards [Step By Step Installation Guide]](https://i.ytimg.com/vi/NOzhgQtl1m4/mqdefault.jpg)