Ductless Cleaning and Maintenance Start to Finish

Our resident ductless expert Jesse shows us his ductless cleaning and maintenance procedure from start to finish. His process includes pulling the blower wheel and washing the evaporator with the RectorSeal Desolv kit. Jesse's other choice tools include a standard pump sprayer and a shop vac.
The ductless system in this video has a gravity drain, so Jesse hooks the shop vac up to the outside drain to make sure water goes out to the vacuum and doesn't spill when he has to work on the drain pan indoors.
Before Jesse begins cleaning the unit indoors, he sets down a bunch of drop cloths and dons shoe covers to keep the customer's property clean.
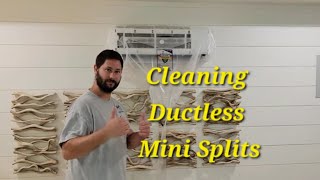
The Desolv kit comes with a bib that goes around the unit that catches and funnels cleaner and water into a bucket; support brackets go around the ductless unit to secure the bib in place. The bib makes it possible to clean a ductless unit in place with a pump sprayer. Otherwise, you'd have to pump down the system and remove the components that need cleaning. The Desolv cleaner within the kit also provides dilution ratios so that you can use the right amount of cleaner for the job at hand. In the case of this video, Jesse uses a 50/50 cleaner and water mixture.
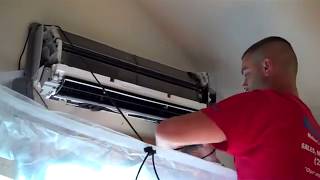
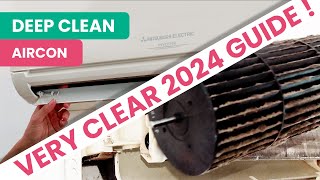
When Jesse takes the unit apart, he likes to take everything outside and clean it. These removable parts include the filters, vanes, blower wheel, and even the unit's housing plates. When it's time to expose the evaporator coil and blower wheel, you'll have to move the drain pan out of the way; the drain pan slides out and down. To remove the blower wheel, you'll have to loosen the set screw mounting it to the shaft.
Jesse sprays the components with cleaner outside and lets them sit for a bit before rinsing them off. He likes to let the cleaner dwell the longest on the blower wheel and rinse it off like a paint roller. When rinsing components on a customer's driveway, try not to leave any dirt spots.
When mounting the bib, you'll want to make sure to fasten the brackets behind the unit securely and tighten the strings connecting the brackets together. The ring supporting the bib hooks up to a metal piece behind the unit to keep the bib upright. Once all the components are in place, you may mount the bib to the support frame. You can also wedge the plastic of the bib behind the unit to prevent any water or cleaner from seeping behind the bib and getting all over the wall or floor. The bib ends in a funnel that you can place into the bucket that contains the kit.
After using a pump sprayer to apply the cleaner and water mixture, you can fill it up with water and rinse off the coil. Jesse also makes sure to wipe everything down behind the coil after rinsing. Once you've finished the cleaning, you may disassemble the bib kit and insert the dried components, including the blower wheel, vanes, filters, and unit housing. After assembling the unit back together, you may clean out the bucket and return all of the Desolv kit contents to it.
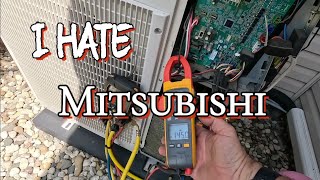
Once we have finished cleaning the unit, we test it to make sure everything is running correctly. We don't use gauges to check the charge because a very small amount of refrigerant loss can affect the unit operation, as ductless minisplit charges tend to be only a couple of pounds. Instead, we use temperature clamps (in this case, we use the Testo 605i clamps). On ductless systems, we check readings on the suction line and expansion line. Jesse then checks the amp draws on the unit and determines that everything is running smoothly and efficiently.
The final step is to confirm proper drainage. Since everything is draining well, Jesse finishes up the job.
Read all the tech tips, take the quizzes, and find our handy calculators at https://www.hvacrschool.com/