DIY solar printing Art tutorial
Pick up a kit here and follow along with this art tutorial
https://www.etsy.com/au/shop/Elementa...
If you enjoy this tutorial give it a thumb's up to show support and if you feel you may make a donation to PayPal [email protected]
Free world wide shipping gift wrap and personalized note. send one to your friends and create prints together over zoom.
Tag your creations with #solarprintingDIYkit to share what ideas and connections you have brought to life ☄with this kit
Join me on insta / elemental_leaf
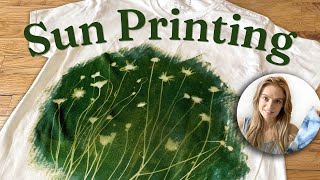
Solar printing is a beautiful process that can help us to pay closer attention to details in nature and to look at things from a different perspective, this is the 1st tutorial I am making for this kit as I'm unable to host my usual art workshops. If you enjoy this tutorial give it a thumb's up to show support and if you feel you may make a donation to PayPal [email protected]
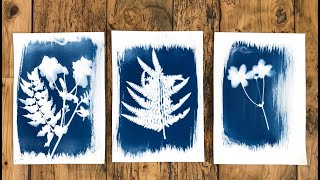
Create your own little works of art with these creative sheets of photo paper , Develop in the sunshine and fix in water.
Instant gratification Art !
Great for gifts
free gift wrapping and personalised note
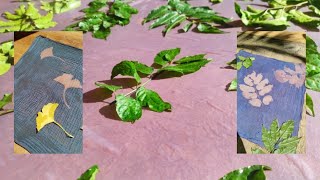
Using items from nature make shadow prints on these hand crafted sheets of coated watercolor paper 180 gsm
Size of sheets
4 x 6 inches
10 x 15 cm.
Perfect size for crafting gift cards or framed prints , tare into smaller pieces if you wish to make small note cards and scrapbook embellishments.
Experiment exposing at different lengths of times to gain various depths of blue. Try different plants or write on glass to make art prints.
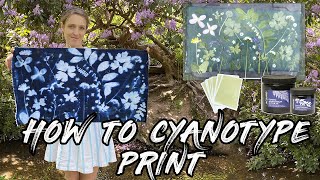
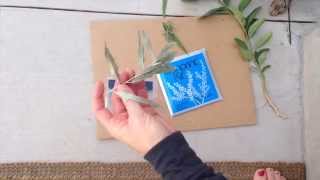
Making prints is fun and easy simply take your kit to a dimly lit space, remove one sheet from your kit sit it on top of a sturdy surface like a book place the plants you wish to print on top of the treated paper place your cellphone bag on top to hold plants in place and use a clothes peg to secure your layers.
Or alternatively substitute the cellophane bag with a piece of clean glass from a old picture frame. ( this works well because the weight helps the plants to contact the paper )
Parental supervision advised here.
Now you are ready to expose your paper to Ultraviolet rays , the sun is a perfect source for this, expose for 520 minutes or until your paper turns beige the longer the exposure the deeper the blue will develop in the water stage. Patience is key.
After exposing in the sunshine carefully carry your set back to your dimly lit space to remove objects , rinse your paper in cold running water making sure not to rub the paper. Pat dry and allow 24 hrs to develop to its full colour depth of beautiful blue.
Optional : fast track this step with a few drops of hydrogen peroxide in developing water to speed up the oxidization.