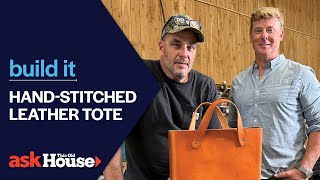
Channel Letters with Jimmy DiResta | Build It | Ask This Old House

Ask This Old House host Kevin O’Connor heads back to Jimmy DiResta’s shop to build a sign.
SUBSCRIBE to This Old House: http://bit.ly/SubscribeThisOldHouse
Time: 2 days
Cost: $75
Skill Level: Moderate
Tools List for Building Channel Letters:
Band saw or jigsaw
Drill press or drill
Palm sander
Hot glue gun
Speed square
Metal shear scissors
Nail gun
Screwdriver
Shopping List:
Plywood
Indoor/outdoor string lights
Medium grit sandpaper
Hot glue sticks
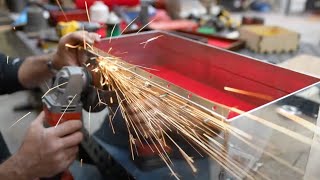
4” flashing
Spray paint
Painter’s tape
Silicone caulking
Steps:
1. Trace the chosen letters onto a piece of plywood.
2. Cut out the letters using a band saw or a jigsaw.
3. Count out how many lights are on the string lights. With that number in mind, trace out on the letters where each light will be placed, being sure to space them evenly.
4. Drill holes for each of the lights and sand the letters thoroughly.
5. Cut small spacers out of the remaining plywood. Glue to the back of the letters to allow for space for the wiring.
6. Wrap the flashing around the letters and secure with the hot glue and a nail gun. Use a speed square as a brake when bending the flashing.
7. Cut two pieces of scrap wood the approximate length of the letters.
8. Prime all the letters with spray paint and allow them to dry. Then, paint the inside of the letters with the desired color.
9. Flip all the letters upside down and cover the holes with painter’s tape to prevent paint from spraying to the other side.
10. Spray paint the outside letters with the desired color. Paint the two pieces of scrap wood for the backing the same color. Allow everything to fully dry.
11. Remove all the lightbulbs from the string lights.
12. With the plug on one end of the letters, hot glue each lightbulb socket into each hole in a logical manner. Once the sockets are all in place, secure each connection with silicone caulking.
13. Screw all the lightbulbs back in place.
14. Secure the two backer pieces to the spacers on the letters with wood screws and a hand screwdriver. To make it easier, you can predrill the holes with a drill.
Resources:
Everything Jimmy and Kevin used to make the channel letters, including the metal flashing, plywood, lights, spray paint, and hot glue, can be found at home centers.
Expert assistance for this segment was provided by Jimmy DiResta (http://www.jimmydiresta.com/).
Build It:
This Old House general contractor Tom Silva, This Old House host Kevin O’Connor, and special guests including Jimmy DiResta, take you through stepbystep DIY projects in this popular video series. From endtables to cutting boards to wine racks to chicken coops and more, learn how to build from the best pros in the game. Segments include mention of all tools and materials needed to get the job done.
Looking for more step by step guidance on how to complete projects around the house? Join This Old House Insider to stream over 1,000 episodes commercialfree.
https://bit.ly/2GPiYbH
Plus, download our app for streaming full episodes to your connected TV, phone or tablet:
https://bit.ly/34RYEP5
Follow This Old House and Ask This Old House:
Facebook: http://bit.ly/ThisOldHouseFB
Twitter: http://bit.ly/ThisOldHouseTwitter
http://bit.ly/AskTOHTwitter
Pinterest: http://bit.ly/ThisOldHousePinterest
Instagram: http://bit.ly/ThisOldHouseIG
http://bit.ly/AskTOHIG
For more on This Old House and Ask This Old House, visit us at: http://bit.ly/ThisOldHouseWebsite
Channel Letters with Jimmy DiResta | Build It | Ask This Old House
/ thisoldhouse