AWESOME dental implant process in 4K

AWESOME dental implant process in 4K
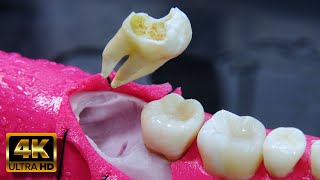
In this video I will show you the complete process of a dental implant, from the placement of the titanium implant in the bone to the placement of the crown on said implant.
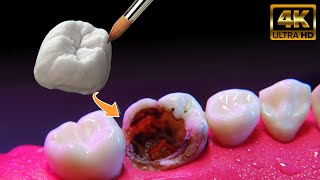
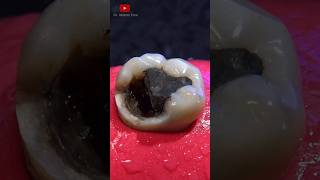
The first step is a good tomographic analysis, not just an Xray, we specialists always ask for a tomography, whether or not you have much experience. It will serve to see the size of the bone that will house our dental implant, the space and the axis of the implant.
PHASE 1: SURGICAL
Anesthesia and disinfection
A good infiltrative anesthetic technique is sufficient for most cases. Disinfection can be with any antiseptic or mouthwash.
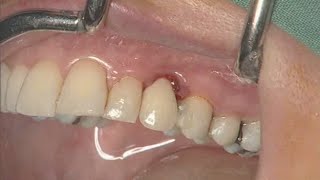
Incision and flap
Depending on the area being worked on, the cuts to the gum can be very small or extensive; Remember that we are simulating a case where everything is ideal and the technique that I describe to you is the TRADITIONAL technique. Once the cuts or incisions have been made, the dentist will separate this flap in order to directly see the top of the bone.
Milling
The specialist will use a series of special drills calibrated according to the size of the implant to be placed. The first drill is usually the lance or "linderman" drill for the first layer of bone which is very dense. The motor used for this procedure is special since the revolutions and torque must be calibrated according to the type of bone, in addition to ensuring good irrigation with serum. Once the diameter of the implant is reached, a special "thread forming" drill is used that will give an exact finish to the bone so that the implant is housed very precisely. It does this with very low revolution and high torque.
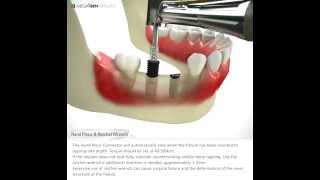
Implant placement
With the same torque as the previous drill, if the equipment has that function, the dentist will start placing the implant in the hole until the point where the torque rises, from this point the last section is done by hand with a special key. called "rache or torque meter". And ready, the implant is well placed, you just have to wait for the OSEOINTEGRATION.
Placement of the implant or scar cover.
Depending on each case, this point may have variants: currently we place a "scar" which is a long cap that exceeds the level of the gum. The second case is when the dentist decides to leave the implant with a very small cover (2nd surgery is required to change the scar).
Suture
With multiple points the specialist will ensure a good closure of the wound. These points will have to be removed around 7 days by your dentist.
PHASE 2: PROSTHETIC PHASE OR REHABILITATION
After 2 to 6 months, the implant will be OSSEINTEGRATED, and will be able to function and will be able to receive the dental load or crown.
impression taking
The dentist must take molds or impressions of the implant through the use of "transfers", which allow the exact location of the implant to be replicated in a laboratory model in order to manufacture the implant crown.
Placement of crown on implant
In this step, the dentist will be able to offer you different types of material to use according to the aesthetic requirements, the most used being: ceramic metal crowns, zirconium (white), Emax (white). The same day the crown is installed, the tooth is ready to go into operation and will require a good oral hygiene for its durability, even the patient must go to his controls with the specialist every year or as indicated.
That was all friends, do not forget to leave your comment, tell us your experience.
Chapters in this video:
0:00 Summary
0:38 Tooth extraction
1:11 Study and planning
1:20 local anesthesia
1:26 Incision and flap
1:54 Drilling protocol
3:23 Dental implant insertion
4:30 Scar Placement
5:20 Option 1: Cementretained crown installation
5:45 Option 2: Screwin crown installation
6:26 Clinical Case