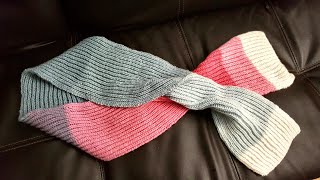
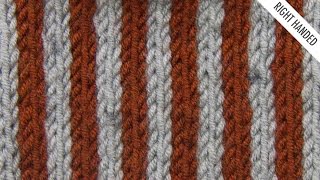
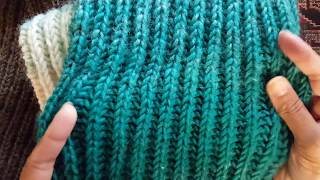
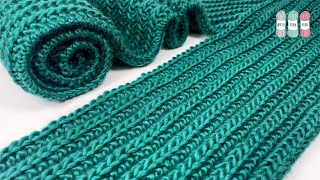
2-color Fisherman's rib scarf with i-cord edges: a Knittycat's Knits project
Video tutorial on how to knit a 2color Fisherman's rib scarf with icord edges. The finished measurements for the scarf shown in video is 60 inches (length) x 7 inches (width). Pattern for this scarf is provided below. The scarf feels very soft and wears really comfortably around the neck (long enough for one wrap around). Hope you give this a try and let me know in comments how it turned out or if you have questions.
Materials: 1 skein (5 oz, 141 g) each of Caron(R) Simply Soft 100% acrylic yarn (Colors: Blue Mint [lighter color], Pagoda [darker color]); US size 8 (5.00 mm) 16 inch or larger circular needle (or doublepointed needle, long enough to hold the stitches); tape measure or ruler, tapestry needle to weave yarn ends, scissors.
Gauge: 13 sts with US size 8 needles knit in 1color Fisherman's rib pattern = 3.5 in (unstretched) [Link to 1color Fisherman's rib video tutorial, which includes pattern in video description]
Abbreviations: K1b=knit into the stitch below; P1b=purl into the stitch below; Sl=slip 1 stitch purlwise; st=stitch; YB=take the yarn to the back; YF=bring the yarn to the front.
Designate the 2 colors as Color A and Color B. For the pattern below and scarf shown in video, the darker color is Color A and lighter color is Color B.
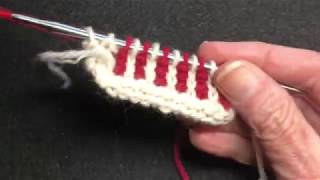
With Color B, cast on 36 sts (I used longtail cast on, but can use cast on method or your choice). Do not turn work. Slide sts to the other end of needle and do setup row.
Setup row (Color A): [K1, YF, Sl1 with the yarn in front, YB, K1], then K1, PI to last 3 sts, then [K1, YF, Sl1 with the yarn in front, YB, K1]. Turn work. [Note: this setup row is only done once]
Row 1 (Color B): [With yarn in front, Sl1, YB, K1, YF, Sl1], then take yarn back and do *K1b, P1. Repeat from * until last 3 sts, then [With yarn in front, Sl1, YB, K1, YF, Sl1]. Do not turn work. Slide sts to the other end of needle and do Row 2.
Row 2 (Color A): [With yarn in front, Sl1, YB, K1, YF, Sl1], then take yarn back and do *K1, P1b. Repeat from * until last 3 sts, then [with yarn in front, Sl1, YB, K1, YF, Sl1]. Turn work.
Row 3 (Color B): [K1, YF, Sl1 with the yarn in front, YB, K1], and do *K1, P1b. Repeat from * until last 3 sts, then [K1, YF, Sl1 with the yarn in front, YB, K1]. Do not turn work. Slide sts to the other end of needle and do Row 4.
Row 4 (Color A): [K1, YF, Sl1 with the yarn in front, YB, K1], then *K1b, P1. Repeat from * until last 3 sts, then [K1, YF, Sl1 with the yarn in front, YB, K1]. Turn work.
Repeat these 4 rows until work measures approximately 60 inches (5 feet or desired length).
Then do regular cast off using Color B. Weave in yarn ends. Blocking is not needed for this scarf. Optional: can add pompoms (as shown for scarf in video) or tassles at the end. Your scarf is finished. Wear it proudly!
Additional links:
Longtail cast on: • How to do long tail cast on: Knittyca...
Adding proactive lifelines: • Adding proactive lifelines: a Knittyc...
1color Fisherman's rib scarf: • Fisherman's rib scarf in 1 color: a K...
2color Fisherman's rib scarf (no icord edges): • Fisherman's rib in 2 colors: a Knitty...
2color Honeycomb brioche scarf: • 2color Honeycomb Brioche Scarf Compl...


![How to knit the fisherman's rib The ultimate tutorial [how to decrease, fix mistakes, etc]](https://i.ytimg.com/vi/-RMh8smt9zE/mqdefault.jpg)