2008 - 2010 Ford Super Duty XL Bench seat cover install

Brian and Raul show the process of removing and reinstalling the covers for a 2008 Ford F250 Super Duty XL Bench. The Covers are made in Vinyl in the color "Medium Camel" to better know the color you need, we can look up the details of your vehicle with your VIN# and a picture of your seats. You can visit our website www.TheSeatShop.com or you can just give us a call at 2147102565
Install Hightlights 3:46 4:48 3:35 7:24 7:39 8:39 9:29 10:33 11:27 12:55 14:40 16:25 18:46 20:20 21:28 21:50 23:00 23:29 24:43 29:05 30:09 31:08 32:00 34:22 35:22 37:27 39:35 40:40 41:15 41:38 42:12 42:55 43:26 45:09 46:15 46:40 48:47 49:52 50:38 50:52 51:28 52:00 53:47 55:00 56:00 56:20
Year ranges and cab configuration :09
Tools 1:38 and 1:55
Start 2:20
Removing the top from the bottom 3:03
Recline wire connection tips 3:46
Recline lever 4:48
Removing top from bottom 6:35
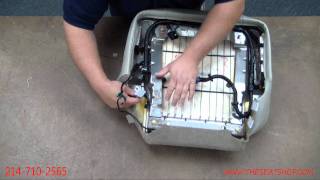
Removing the bottom frame 7:39
Removing the tracks 9:29
Removing bottom cover from frame 10:33
Hog ring explanation 11:27 and 18:46
Removing bezels 12:55
Removing seat belt ends 14:40
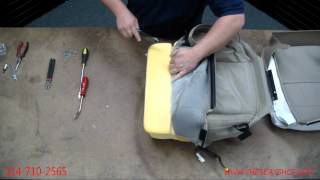
Seat foam tips 16:25
Marking Cutlines 20:20
How to clip J clips onto the frame 21:50
If the cover seems too short 23:14
How to avoid ripping clips 23:28
Trimming/Cutting seatbelt slots 24:43
If you accidentally threw your plastic bezels away 29:05
Using a Razor Blade 30:09
Why cutting Seatbelt/Bezel slots is done while the new cover is installed. 31:08
Clipping bezels 32:00
Clipping the new bottom cover 34:22
Installing the manual track frame 35:22
Bottom seat frame orientation 37:27
Top deconstruction 39:00
Unconnecting the top J clips 39:35
Unrolling the top cover 40:40
Removing top cover hog rings from foam 41:15
If you have a center console 41:38
Removing center console "If you have one" 42:12
If velcro is accidentally torn off seat foam 42:55
Start of the top installation 43:26
Rolling cover over the foam 45:09
Realizing the cover needs readjusting 46:15
Readjusting the top cover 46:40
Rolling down cover 48:47
Adjusting cover to the correct position 49:52
Heat Gun Tip, only on vinyl DO NOT USE ON CARPET 50:38
Clipping the top J clip 50:52
When to use a Razor Blade 51:28
Correcting an odd seam rolled in the wrong direction 52:00
Steamer/hairdryer/heat gun tip 53:47
Connecting both the bottom and top 55:00
Making sure the cable is installed in the right place 56:00
Reconnecting the wire ends onto the frame 56:20