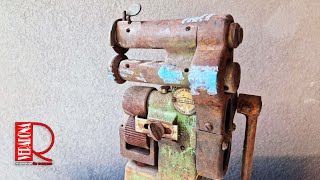
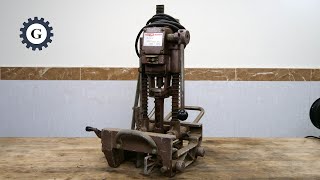
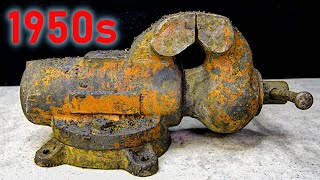
1971 American Pipe Vise Restoration - Restoration Videos

#restoration #viserestoration #restorationvideos
1971 American Pipe Vise Restoration Restoration Videos
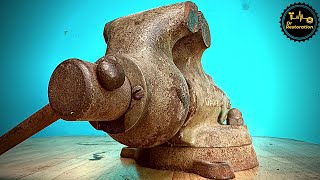
In this video, you will watch an Erie Tool Works branded American made pipe vise which was made in March 1971 get restored.
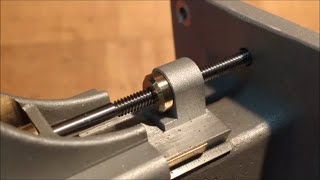
Are you ready to see everything possible to be done in a pipe vise restoration video be done in detail? I first start dismantling every piece in this vise, vise the which served many years but then were thrown aside. I immerse every single piece in rust remover and let it rest there for a day. The reason for this is because the product is made out of steel. If it was cast iron I would let it sit for a less amount of time. After I took them out of the rust remover, all the pieces were completely free of rust. After a brief brushing and then neutalizing with water, I sandblast them. In meanwhile, I used my mobile phone as a second camera, I hope you like it. After sandblasting, I realized 713 was written on the inside of the piece holding the top jaw. I understood that it was made in March 1971. Not too old, but a beautiful 53 year old vise. I file out the pins which are used to lock in the jaws. And I make the new ones as hidden nuts. Since the handle was bent, I wanted to use the ball parts with the new shaft I am going to make. But because there were deformations and tears on the old ball parts I needed to make a new pair, thus I manufacture a complete new handle out of 3 new parts, made out with a hidden boltnut technique. I fill out the later drilled hole on the bottom part of the body with MIG weld. After that, I level out the irregularities found on the both upper and lower parts by heating them up, then doing a leveling. Finally I countersink the bolt holes and sandblast to get it ready for the painting. I disassamble the handle where you use it to squeeze the vise to a table by heating it up, then get it ready for the painting. With the other three parts ready, all the pieces are now ready for the painting session. And I use hammered red paint to paint them. I paint them with a regular brush and a paint roller brush. After the paint dries out, I coldblue the moving parts. I knew those parts before, so I taped them. I restore the teeth on the bigger shaft and then shine it up to a mirror shine. And after, I do the same with the smaller shaft which helps fastening to a table. Since one small piece is missing from this part, I make a new fitting one. I design it so that two pins would be helping me fix the piece in. I start restoring the upper and the lower jaws. But because these jaws were very hard, I had hard time sanding them by hand. So I used the milling machine. I got a perfect finish on those with final surface grinding, got them perfect as I wanted. I decide not to use the old nuts and bolts. Non of them are original, and they don’t fit well. I begin making square nuts and bolts. I make 8 nuts, 8 bolts total. It was satisfying to create square nuts and bolts which I made in a historically correct way, designwise.
There will be lots of lathing scenes, I think you will like them. The rough lines of the project were like this. After every piece were ready, I assembled them to reach the picture I wanted to see. I hope this outcome fulfills you. If you liked it, please do like the video, leave a comment and if you are not subscribed, subscribe. I try to read and answer every comment you leave to me. See you in the next project. Greetings to everyone.
Meine Mechaniker.
00:01 pipe vise restoration
00:05 don't forget to subscribe to my channel
00:09 check the description for more info
00:34 there are crushed parts
00:36 the handle is bent
00:39 non original bolts and nuts
00:41 there are crushed parts here as well
00:45 these two holes are original
00:51 this hole is not original, it was drilled later
00:57 let's start disassembling
01:03 it is not wd 40
01:21 as it seems, ISO wrench is not compatible
01:26 wrench set inch size
03:23 non original bolts and nuts
04:13 rust remover
05:27 sandblasting
06:59 march 1971
07:06 Richard Nixon was the president
07:52 I'm making new pins
10:52 l will make new ones
10:57 I'm making new handle balls
12:58 l'm making a handle
14:13 new orings
14:37 arc welding
17:45 I sanded again
17:47 hammered red paint
18:20 I always get better results with a roller
18:56 cold bluing
19:38 big top shaft 1 unc thread
19:44 thread file
20:25 small lower shaft 3/4 unc thread
21:02 this moving part is missing and I will make a new one
21:36 pin holes
22:19 new pins
22:22 successful
22:34 upper jaws
22:43 hardened steel
22:46 I use a carbide router bit because it is very hard
23:05 lower jaw
23:18 surface finishing
23:25 edge breaking
23:40 diamond file
25:02 I'm making new square bolts
26:49 I'm making new square nuts
27:03 edge breaking
27:07 30 degree bit
28:32 I'm making other new square bolts
29:31 long bolts
29:39 short bolts
29:50 I'm making other new square nuts
30:50 all parts are ready
31:20 let's start assembly
35:11 ready
35:56 test

![Someone paid an equivalent of $2000 for this in 1914 [Restoration]](https://i.ytimg.com/vi/rw_8FWJuSho/mqdefault.jpg)


![Why Did They Stop Making These? [Restoration]](https://i.ytimg.com/vi/gh0SV8aPnMU/mqdefault.jpg)