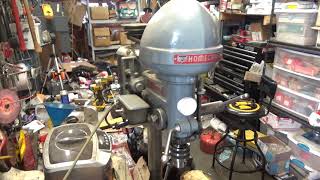
1953 Delta Rockwell Homecraft Drill Press Restoration | Part 2 - Drill Press and Stand

This is Part 2 of a twopart series restoring a 1953 Delta Rockwell Homecraft drill press. Part 1 is the restoration of the motor; Part 2 is the restoration of the drill press itself and the stand.
WATCH PART ONE (Motor Restoration): • 1953 Delta Rockwell Homecraft Drill P...
Delta Homecraft No. 11120 11” Drill Press Operating and Maintenance Manual: http://www.vintagemachinery.org/pubs/...
Delta Rockwell serial number lookup (determine what year and where your Delta Rockwell tools were made!): http://wiki.vintagemachinery.org/Delt...
DIY Drill Press Stand: https://sawsonskates.com/diydrillpr...
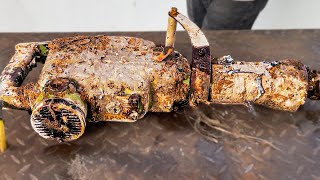
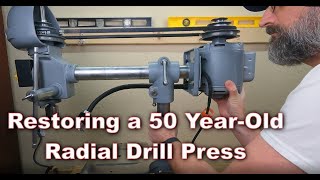
This is a No. 11120 Delta Homecraft 11” Drill Press manufactured in the Tupelo, Mississippi Delta factory in 1952. The Vintage Machinery link above has a database of all serial numbers for Delta equipment from the 1940’s1980’s that can tell you both the year and location where your Delta tool was made just based on the serial number. This drill press was my grandfather’s that he used his whole life for every DIY project around the house. We used it together for woodworking projects he taught me when I was a kid in the 1990’s. Over the years it was painted and repainted, wiring added, and sat on a retrofitted stand with a dedicated metal toggle switch to start it up. When he passed away it sat around for a while before finally coming to me. You’ve probably seen it used in other restoration projects of mine, but the time finally came for its own moment in the spotlight.
____________ Timestamps _____________
0:00 – 0:27 Overview
0:28 – 6:27 Disassembly
6:28 – 11:06 Degreasing and wire wheeling parts
11:07 – 14:09 Stripping paint
14:10 – 15:08 Table surface cleanup
15:09 – 16:22 Priming and painting
16:23 – 17:31 Reusing switch and new switch box
17:32 – 26:25 Reassembly
26:26 – 26:54 New table mounting
26:55 – 27:46 Wiring and mounting switch
27:47 – 28:38 Before/After
29:01 – 30:14 Testing
30:15 – 30:26 Thank you and please subscribe!
_____________ Tips for restoring your own Delta Homecraft Drill Press ______________
I recommend breaking down the restoration into smaller ‘chunks’. There are so many parts to keep straight that unless you are filming where everything has to stay disassembled for the ‘reassembly’ layout shot it will be easier to restore things section by section. Take lots of pictures along the way to reference. Start with removing the motor – keep the mounting bracket attached when you unmount the motor unlike what I show in the video, it’ll be much easier. Then, remove the drill press head from the stand.
You’ll now have three ‘chunks’ to work with – the stand, the drill head, and the motor. The stand parts are easy to restore, just don’t sand the table tops too severely or you can make them unlevel. The drill press head further breaks down into smaller ‘chunks’ – the actual drill column/quill, the feed/return mechanism, and the spindle. Most components will just need a thorough degreasing and wire wheel before regreasing and reassembling. You can always refer to the owner’s manual PDF (linked above) for the exploded view of the whole drill press.
Be careful with the return mechanism’s spring – keep it its housing! There’s no easy way to get that spring back into the housing if it’s ever uncoiled. When you reassemble the return mechanism, make sure to tighten it counterclockwise and to the point to where you can’t physically make another turn – this will maximize the return speed. For the drill chuck, I just wire wheeled the exterior and treated the inside with silicone lubricant. It’s a bit involved to actually disassemble and reassemble the chuck itself, but there are lots of helpful resources for that, including a possible future Catalyst Restorations video on that topic!
For paint, I chose Rustoleum’s hammered paint in gray – this is both close to the original color and also and extremely durable paint with excellent adhesion for tools. You can choose to prime all your parts or just paint directly onto the parts. I recommend stripping the parts down to bare castings for maximum adhesion and durability, but you should at least sand painted surfaces with ~220 grit sandpaper if you don’t plan to strip it down.
_________ Social Media ________
Instagram: @catalyst_restorations
MERCH SHOP: https://mystorecae4fb.creatorsprin...
#restoration #Delta #drillpress


![I Restored and Enhanced this $1 Antique Wood Level with Brass! [feat. How to Brass Plate Steel]](https://i.ytimg.com/vi/iCwDMyTs4-s/mqdefault.jpg)


![Die Filer [Restoration]](https://i.ytimg.com/vi/Si2a3Bs9QBc/mqdefault.jpg)