130-year-old Bolt Cutter Complete Teardown and Restoration

These bolt cutters (actually called bolt ‘clippers’ in the original patent) were patented in October of 1892 by Henry K. Porter himself (patent # 484,670). It’s unclear exactly when this exact pair was made, but all signs point to them being produced right around this patent date.
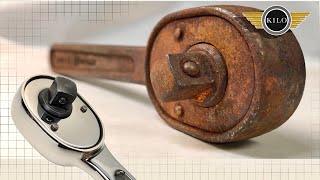
These bolt cutters were covered in concrete and a thick layer of rust and were missing the rubber bumpers on the handle and the ‘eyebolt’ and nut on the right handle. The handles themselves were badly mangled and the cutting jaws were chipped and had very little available cutting edge left to resurface them.
Psst…. Did you find the LEGO mini figure hidden in the video?
Timestamps
0:00 – 1:31 Overview
1:32 – 2:17 Press straightening handles
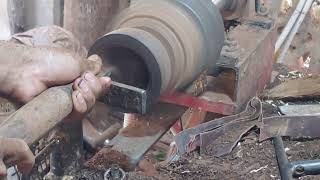
2:18 – 7:35 Disassembly
7:36 – 11:43 Rust and concrete removal
11:44 – 14:36 Sanding and cleaning up castings and cutting jaws
14:37 – 16:44 Cold bluing hardware
16:45 – 17:52 Filling in casting holes
17:53 – 19:06 Priming and painting
19:07 – 20:45 Making a new eyebolt screw
20:46 – 21:20 Making new pins
21:21 – 21:53 Making new rubber bumpers
21:54 – 28:58 Reassembly
28:59 – 29:46 Paint touchups and painting pins
29:47 – 30:33 Reveal and before/after
30:34 – 31:02 Testing
31:03 – 31:10 Thank you and please consider subscribing
Tips for restoring your own HK Porter bolt cutters
Start by removing as much of the hardware as you can without grinding off any rivets. WD40 can help loosen up stuck hardware. Keep all the hardware from the lefthand side, righthand side, and cutting jaws in separate containers throughout the cleaning and restoration process to make sure everything goes back exactly where it came from. Then, you can decide if you want to remove the rivets on the upper handle portion – if you’re careful with cleaning and masking, you can probably get away with repainting without having to remove them and make new ones. Cleaning and rust removal can be done a number of ways. I prefer EvapoRust or electrolysis, but a cheaper solution is plain old vinegar. Soak for a day, then scrub with a steel wire brush and your parts will be cleaned to bare metal! For paint prep, be sure to wipe all the parts with a degreasing solution or acetone and mask off any areas with mechanical motion – the paint layers will cause interference or rubbing. Many spray paints are a paint and primer in one. I prefer using Rustoleum’s metal etching primer followed by a Rustoleum color of your choice. Allow enough time for the paint to harden (a few days, ideally at least a week) because reinstalling the hardware is bound to cause some scrapes and dings. For the nuts and bolts and other hardware, it’s up to you if you decide to leave them bare metal or blacken them with cold or hot bluing (blackening). To clean up the cutting jaws, I used an angle grinder with a 120grit flap disk. Be extremely careful not to grind too hard or too long on the jaws, as you’ll heat them up and ruin the hardened condition of the blades. Start by cleaning up all the edges just enough to remove any chipped edges. Then, reshape the jaw tips by following the existing slope of the jaw and then beveling just near the tip. The goal is not to create a sharp tip, but a sharpish blunted tip to maximize the cutting power without damaging the jaws on every cut. To replace the rubber bumpers, I bought some rubber stoppers from Home Depot for $1.50 and cut them to size. After everything is painted, reverse your disassembly to get the final product! Be sure to oil the joints regularly. You can also paint the raised letters on the handles a different color to stand out from the paint, but I personally do not like that look as they were never like that originally and it takes an ultrasteady hand to truly look good.
Rustoleum ‘Hammered’ Spray Paint Tips
The key with hammered finish paint is to shake the can vigorously for 5 minutes to really mix up the emulsifiers that give the hammered look. Then, spray one mediumheavy coat, wait 510 minutes, then apply one more medium coat. Spray distance also affects the degree of the hammered look. Close range (58”) gives a very fine metallic look while less than a 12” range provides the true hammered look that the spray paint cap looks like. Unfortunately, some colors just simply look better/worse in hammered finish that others.
Cold Bluing Tips
Start by thoroughly cleaning the parts in degreaser and/or acetone and then do not touch your pieces with your bare hands. Pour some of the bluing solution into a separate container/dish/the bottle’s cap and apply to your part with a brush or dunk the part in the solution in your separate container. Wait 30 seconds then rinse the part in cold water. Repeat cold bluing until part is uniformly black. Then, soak in any oil overnight.
Social Media
Instagram: @catalyst_restorations
#restoration #antique #boltcutter


![Rare Double Cleaver [Black Blade With Kingwood Handle]](https://i.ytimg.com/vi/mFusXojhLjQ/mqdefault.jpg)